Lemon Poppyseed Bundt Cakes

Lemon Poppyseed Bundt Cakes

Here is a little known fact:I love birthdays and especially birthday parties and more importantly, MY birthday party.

I turn 30 this year for the fourth time. To celebrate, the Hubster and I are planning a trip to Orlando in June. My birthday theme is Disney princess, so we plan to hit up the Magic Kingdom and try to find and take a picture with, as many princesses as we can. I may even wear my own tiara and become my own Disney princess for a day. We tried to make a reservation to eat at Cinderella’s Royal Table, but they are booked months in advance.  So if anyone knows any secrets on how to get in, then please let me know! In addition to Magic Kingdom, we also plan to go to Epcot for a day and then head on over to Universal to visit Harry, Ron, and Hermione at the Wizarding World of Harry Potter. Yeah. Like I could go to Orlando and not go to the WWOHP. As if.

Anyway, I am super excited, so I made you guys cake to celebrate.

Lemon Poppyseed Bundt Cake

I actually had a lot of help this week when thinking up this recipe. I realized I wanted to make my cake with lemon because I love lemon desserts in the Spring. So after talking with my Mom, I decided to use her fabulous southern pound cake recipe as the base of mine. Then a student at school, I call him Harvard, actually thought mini bundt cakes would be perfect to use with my idea. I couldn’t have agreed more, so onto Amazon I went to order my mini bundt baking pan. Wilton makes the best Elite baking pans and my pan makes 6 mini bundt cakes at a time. Finally, Savory Spice Shop carries Organic Lavender flavoring, so I picked up a bottle to go into my icing. So there you go. The cutest Lemon Poppy Seed Bundt Cakes on the block. And oh. so. delicious.

Lemon Poppyseed Bundt Cakes

Yield: 18 mini bundt cakes

Recipe by Carrie, adapted by Mom

Ingredients

  • 1 cup butter
  • 3 cups flour
  • 3 cups sugar
  • 1/4 cup poppy seeds
  • 6 eggs
  • 1 pint of sour cream
  • 2 tablespoons of milk
  • 1 teaspoon vanilla
  • 1 teaspoon lemon flavoring
  • 1/4 teaspoon baking soda
  • pinch of salt
  • zest of one lemon
  • For the lavender icing: 1 cup confectioner's sugar, 1 teaspoon lavender flavoring, and 4-6 teaspoons heavy cream

Instructions

  1. Preheat oven to 350 degrees and prepare pan with flour nonstick spray.
  2. Cream butter in bowl of electric stand mixer until light and fluffy.
  3. Add sugar and mix well.
  4. Add eggs, one at a time.
  5. Add milk, vanilla, lemon, zest and sour cream.
  6. Combine flour, baking soda, poppyseed, and salt.
  7. Slowly add flour to mixture until blended.
  8. Spoon carefully into prepared mini bundt pan.
  9. Bake for 18-20 minutes or until golden brown.
  10. Carefully spoon icing onto cake and top with lemon zest.
  11. For the Lavender icing:Start with 1 cup confectioner's sugar, 1 teaspoon lavender, and 4 teaspoons heavy cream.
  12. Continue adding cream by the teaspoon until desired consistency.
  13. To make a bigger batch, double the recipe. I choose to make my icing just before serving, so my icing doesn't harden.
Schema/Recipe SEO Data Markup by ZipList Recipe Plugin
http://www.bakenoprisoners.com/wordpress/index.php/lemon-poppyseed-bundt-cakes/

Lemon Poppyseed Bundt Cake

Mom’s Southern Pound Cake recipe. Thanks Mom.

Lemon Poppyseed Bundt Cake


Pink Champagne Meringue

I am not a fan of meringue. I was not a fan of meringue. Even spelling meringue gave me a headache. I mean, other than the white fluffy on top of my banana pudding, I had quite the disdain for it. That was before. Everything has changed.

Pink. Champagne. Meringue.

It is girly. And sparkly. And oh so pink-a-delicious. 

Pink Champagne Meringue

This meringue has changed my world.

I will never again use the words hate and meringue in the same sentence.

Pink Champagne Meringue

I decided to tackle the art of meringue during Spring Break, this week. I went with the whole stay-cation route, so that I could spend the entire week focusing on new recipes, like this one.

Pink Champagne Meringue

These meringue bowls are so simple to put together. I used Wilton tip #21 to make a circular base at the bottom. I then piped rings around the circle until I reached my desired height.

Pink Champagne Meringue

I made these sweet meringue roses using a technique I found over at the fabulous i am baker, and then sprinkled them with shimmering, edible pink glitter.

Pink Champage Meringue

The whipped cream for my meringue cups is so easy. Combine 1 cup cream with 1 1/2 tablespoons confectioner’s sugar and whisk on high in your stand mixer bowl using the whisk attachment until soft peaks form. That’s it!

Pink Champagne Meringue

Pink Champagne Meringue

Recipe by Carrie

Ingredients

  • 5 large egg whites, room temperature
  • 1 1/2 cups sugar
  • 1/2 teaspoon cream of tartar
  • 1/2 teaspoon salt
  • 5 drops of champagne oil flavoring (or any other flavoring or 1 teaspoon vanilla)
  • Pink gel food coloring
  • pink edible glitter

Instructions

  1. Preheat oven to 200 degrees.
  2. Line cookie sheets with parchment paper or silapat.
  3. In your stand mixer bowl with whisk attachment, whisk egg whites, sugar, cream of tartar, and salt until just combined.
  4. Pour contents into a double boiler with a few inches of simmering water in the bottom pan.
  5. Whisk contents in top pan for 7-10 minutes or until sugar has completely dissolved.
  6. Return contents to stand mixer bowl and whisk until stiff, glossy peaks form.
  7. Mix in a very small amount of pink food coloring, along with 5 drops of champagne oil flavoring.
  8. Transfer mixture to a pastry bag fitted with Wilton tip 1M for roses, Wilton #30 star tip (or similar) for kisses, or Wilton #21 tip for meringue bowls.
  9. Kisses:Pipe 3/4 inch high kisses on your cookie sheet about 1/2 inch apart.
  10. Bowls: Pipe a flat, circular bottom layer for your base and then carefully pipe in a circular motion until desired height.
  11. Bake for about 1 hour or until they are completely dry on the outside.
  12. Transfer to a wire rack to cool completely.
  13. Fill with fresh strawberries or raspberries and top with whip cream.
Schema/Recipe SEO Data Markup by ZipList Recipe Plugin
http://www.bakenoprisoners.com/wordpress/index.php/pink-champagne-meringue/

Pink Champagne Meringue

Doctor Who Party {Part II}

New mouth. New rules.

The latest Doctor has been around for awhile, but I always like to revisit the episode where the Doctor meets Amelia Pond for the first time. He has just regenerated and that makes him very, very hungry! The problem is, he has no idea what he likes to eat. So he has Amelia search through her cupboards. She offers him yogurt, beans, bread and butter, bacon; none of which he is even remotely fond of. He finally settles himself on fish fingers and custard. Ew! Gross. I know. Luckily, when I thought about recreating this unusual dish, I decided to make a fish finger look-alike.  Instead of actually fish fingers, I made tea-infused shortbread.

"Fish Sticks" and custard

The tea infusion itself is actually very simple. Whenever you are baking with tea, steep approximately 1 1/2 teaspoons of loose leaf tea per tablespoon of butter. It is also a good idea to use unsalted butter, so as not to alter the flavor of the tea.

Tea Infused Shortbread - "Fish Fingers"

I used crumbled Biscoff cookies for the “breading” of my fish sticks. Just pulse 10-15 cookies in your food processor and then roll your “fish sticks” until coated.

Tea Infused Shortbread - "Fish Fingers" & Custard

Recipe by Carrie

Ingredients

  • 2 cups, plus 2 tablespoons butter, softened
  • 1 cup, plus 3 teaspoons loose leaf tea
  • 1 tablespoon honey
  • 1 cup brown sugar
  • 3 1/2 cups flour
  • Package of biscoff cookies

Instructions

  1. In a small saucepan over low-medium heat, melt the butter until it just becomes a liquid.
  2. Add the loose tea leaves.
  3. Continue heating the mixture for about 5 minutes on low-medium heat.
  4. Remove from the heat and allow to stand for another 5 minutes or until the color of the butter is slightly tinted by the tea leaves; it will have a hint of green.
  5. Pour the mixture through a fine sieve, pressing hard on the tea leaves and then discard the leaves.
  6. Let the butter come to room temperature.
  7. For the "breading", pulse 10-15 biscoff cookies in your food processor, until they become a fine crumb mixture.
  8. In your stand mixer bowl, cream tea infused butter, brown sugar, and honey until light and fluffy.
  9. Add flour, 1 cup at a time and mix well.
  10. Your dough should be pulling away from the bowl at this point.
  11. Roll and shape tablespoon portions of dough into "fish finger" size; about 3-5 inches long.
  12. Roll each "fish finger" in the biscoff cookie crumbs to give it the "breading" effect.
  13. Place 1/2 inch apart on ungreased baking sheets lined with parchment or silapat.
  14. Bake at 325° for 15-20 minutes or until cookies are lightly browned.
Schema/Recipe SEO Data Markup by ZipList Recipe Plugin
http://www.bakenoprisoners.com/wordpress/index.php/doctor-who-party-part-ii/

*Baked custard recipe courtesy of Betty Crocker

Tonight marks the Season premiere of Doctor Who 7.5. We have a tradition in our house that before every new episode, we make homemade popcorn. It kind of makes us feel like we are at the movie theatre. This season, I thought I would step it up a notch with my Geronimo Popcorn Mix. Geronimo is the Doctor’s favorite catch phrase. Every Doctor has one or two.

Geronimo Popcorn Mix

I love the sweet and salty in this snack. York Peppermint patties have always been one of my favorite candies, but these minis, along with the gold and silver stars make it cool.

Geronimo Popcorn Mix

Geronimo Popcorn Mix

Recipe by Carrie

Ingredients

  • Microwavable movie theater popcorn or you can make your own
  • York Peppermint blue and white minis
  • White chocolate melts
  • Crushed pretzel sticks
  • Edible gold and silver stars

Instructions

  1. Microwave your white chocolate melts according to the package instructions; set aside.
  2. Microwave your movie theater popcorn or make your own.
  3. While the popcorn is warm, add the crushed pretzel sticks, and York Peppermint blue and white minis.
  4. Drizzle the white chocolate over the popcorn mix and stir gently.
  5. Top with edible stars.
Schema/Recipe SEO Data Markup by ZipList Recipe Plugin
http://www.bakenoprisoners.com/wordpress/index.php/doctor-who-party-part-ii/

 The Doctor would never go anywhere without his sonic screwdriver, so I thought I would make it into a drink for tonight.

DSC02733_600x400

I am in love with my Soda Stream and it came in handy for this drink perfect for any Doctor. The mango energy drink gives the ordinary screwdriver, a sonic kick.

Sonic Screwdriver

Sonic Screwdriver

Recipe by Carrie

Ingredients

  • 1 1/2 ounces Vodka (optional)
  • 4 ounces orange juice
  • 4. ounces Soda Stream Mango energy drink or Red Bull
  • 5 ice cubes
  • Edible gold stars for garnish

Instructions

  1. Make Soda Stream Mango energy drink according to instructions.
  2. Combine vodka, orange juice, mango energy drink, and ice cubes; stir gently.
  3. Pour into desired glass and garnish with edible gold stars.
Schema/Recipe SEO Data Markup by ZipList Recipe Plugin
http://www.bakenoprisoners.com/wordpress/index.php/doctor-who-party-part-ii/

Did you like our Timey Wimey font used on Part I & Part II of our Doctor Who Party? Want your own? Go LIKE our Facebook page and then download it here.

{FREE} Doctor Who Font Download


**Wibbly Wobbly Timey Wimey background art for “Fish Fingers” & Custard courtesy of weallscream4icecream & Brian HokeDSC02721_600x400


Triple Chocolate Stout Whoopie Pies

Triple Chocolate Stout Whoopie Pies

I love holidays…

I mean, seriously, who doesn’t?!

In order, my favorites are:

In first place, Halloween

Then, Thanksgiving

Christmas

St. Patrick’s Day

Flag Day (my birthday)

Easter

Valentine’s Day

And dead last, New Year’s Eve

Plus, any holiday where I get the day off from school makes the list too, President’s Day, Martin Luther King, Jr.–even snow days are included.

I love holidays because they are normally full of family, tradition, and food…I am typically the one in the kitchen surrounded by the ones I love, cooking or baking a recipe that has been handed down for ages or at the very least, expected each holiday.

St. Patrick’s Day is no exception.

Every year, I ask the Hubster if we can go out to the local Irish pub for someone else’s homemade Irish fare and every year he says, but what about our traditional black and tan corn beef sandwiches…and my fried potatoes and turnips…and my Irish creme pound cake….

I can just see his lower lip quivering now. ;) Just kidding.

So every year, while jamming out to Flogging Molly, I cave and make just the two of us, our Black and Tan corn beef sandwiches with fried potatoes and turnips, and my Irish creme pound cake for dessert.

This year, I am adding these adorable Triple Chocolate Stout Whoopie pies to the mix.

Triple Chocolate Stout Whoopie Pies

These whoopie pies are so rich and chocolatey and so easy to put together!

Triple Chocolate Stout Whoopie Pies

To start, I always make sure to cream my butter and sugar until light and fluffy.

Triple Chocolate Stout Whoopie Pies

I just happen to have a Whoopie Pie pan, but if you don’t, then just scoop a 1 1/2 tablespoons of batter onto your cookie sheet.

Triple Chocolate Stout Whoopie Pies

I even made a few pies in the shape of a shamrock using a cookie cutter.

Triple Chocolate Stout Whoopie Pies

They can be very fragile, so make sure you allow them to cool completely before assembling.

Triple Chocolate Stout Whoopie Pies

Triple Chocolate Stout Whoopie Pies

Recipe by Carrie

Ingredients

  • 1 cup flour
  • 2 ounces semi-sweet chocolate
  • 2 ounces unsweetened chocolate
  • 1/2 cup Dutch process cocoa powder
  • 1/2 teaspoon baking soda
  • 1/4 teaspoon salt
  • 3/4 cup firmly packed light brown sugar
  • 8 tablespoons (1 stick) unsalted butter, room temperature
  • 2 eggs, room temperature
  • 3/4 teaspoon vanilla extract
  • 1 cup heavy cream
  • 1/4 cup Guiness Extra Stout

Instructions

  1. Preheat oven to 325 degrees. Grease and flour the wells of your Whoopie Pie Pan or get out your cookie sheet and line it with parchment or a silapat.
  2. In a bowl, whisk together the four, baking soda, and salt; set aside.
  3. Combine your semi-sweet and unsweetened chocolate in a microwave safe bowl. Heat for 1 minute and then stir. Continue to microwave for 30 second increments until completely melted; let cool.
  4. Once cooled, add cocoa and cream and whisk together. It may seem a bit lumpy.
  5. In the bowl of a stand mixer, beat together the brown sugar and butter on medium speed until combined; about 1 minute.
  6. Add the vanilla and the eggs and beat until fluffy.
  7. Reduce the speed to low and add your chocolate mixture. Mix until combined.
  8. Add your flour mixture in 2 additions, alternating with the Guiness Extra Stout; beginning and ending with the flour mixture.
  9. Beat until each addition is incorporated, stopping occasionally to scrape the sides of the bowl.
  10. Fill each well or cookie sheet with 1 1/2 tablespoons of batter.
  11. Bake for 8 to 10 minutes or until a toothpick inserted into the center comes out clean.
  12. Let cool cool completely before frosting.
  13. Frost with your favorite marshmallow butter cream and roll in sugar crystals.
Schema/Recipe SEO Data Markup by ZipList Recipe Plugin
http://www.bakenoprisoners.com/wordpress/index.php/triple-chocolate-stout-whoopie-pies/

Triple Chocolate Stout Whoopie Pies

Cotton Candy Cupcakes

DSC01904_600x400

Being the Science nerd that I am, I love Tom Lehrer. If you have never heard of him, and many people haven’t, he is a genius mathematician, scientist, and song writer. Every year, during our Chemistry unit, I challenge my students to memorize his now legendary song, “The Elements”, where he sings the names of most of the chemical elements to the tune of the”Major-General’s Song” from Gilbert and Sullivan’s Pirates of Penzance. If they can do it, then they win a cupcake. Last year, my students won these Pink Lemonade cupcakes. This year, they voted for these Cotton Candy cupcakes.

These cupcakes are super easy and will take you very little time to make. All you need is your favorite vanilla cupcake recipe or vanilla cake box mix, cotton candy flavoring oil (you can get it here), and fresh cotton candy. Use your flavoring oils very sparingly. A little goes a long way and you don’t want to over do it with your cupcakes. Honestly, they are very similar to the HP Honeydukes cupcakes I made awhile back, but I left out the cotton candy spinning sugar because I felt it didn’t need it. It give the cakes a more subtle taste and lighter feel.

DSC01913_600x400

Once I have everything mixed together for my cupcakes, then I add my cotton candy flavoring oil or I add it when I add my vanilla.

I also add a few drops to my favorite butter cream frosting too!

DSC01916_600x400

I break off little pieces of cotton candy right before I plan on serving the cupcakes. If you wait too long, then the cotton candy will melt into your frosting. It will make a very artsy swirl into your frosting, but it won’t look, or taste, as great.

DSC01923_600x400

**A big thanks to fan, Whitney, for sending me the adorable cupcake dome! It was the perfect way to showcase these cupcakes!

Flourless, Sugarless, Gluten Free Peanut Butter Cookies

DSC02152_600x400

Peanut Butter and I have always had a very intimate relationship. It is with me every morning for breakfast. It makes time for me in my afternoon protein shakes. And it often finds its way into some of my very favorite desserts. Sometimes it even sneaks onto a spoon late into the night. My friend, Peanut Butter, also comes in a variety of delicious flavors: white chocolate, cinnamon raisin swirl, dark chocolate, and even maple. (Thanks to the ever so creative Peanut Butter & Co).

So in honor of National Peanut Butter Day, I have come up with the perfect, guilt-free treat!It really kills three birds with one stone for me. First, I get to continue my relationship with Peanut Butter without feeling guilty the next day. Second, my dieting friends will love me because I brought in a treat that they can actually eat. And third, I finally have cookies to put into my new talking TARDIS cookie jar. It’s a win-win…win!

 DSC02113_600x400

When you first combine the ingredients, the dough may seem a bit greasy.

Don’t worry. It is just the peanut butter and the lack of flour.

DSC02132_600x400

I used a small cookie scoop to form the cookie dough balls and then I used the Picture Perfect Cookie technique that my blogger friend, Jennifer over at Not Your Momma’s Cookie, brilliantly came up with. (By the way, it totally works!)

DSC02139_600x400

I also made a batch of my peanut butter cookies loaded with chocolate chips!

DSC02145_600x400

Let them cool completely before serving…Oh who am I kidding…I ate 3 or 4 right out of the oven. :)

DSC02158_600x400

Flourless, Sugarless, Gluten Free Peanut Butter Cookies

Recipe by Carrie

Ingredients

  • 1 egg
  • 1 cup Splenda or other sugar substitute
  • 1 cup reduced fat peanut butter
  • 1 teaspoon vanilla
  • 1/2 teaspoon baking soda
  • 1/2 teaspoon Fleur de Sel
  • Optional: 1/4 cup chocolate chips or chopped peanuts

Instructions

  1. Preheat oven to 350 degrees.
  2. Place parchment paper or silapat on a baking sheet and set sheet aside.
  3. Using your stand mixer, blend all ingredients together until just combined.
  4. Using a small cookie scoop, form your dough ball about 1 inch in diameter.
  5. Bake for 10 minutes or until lightly golden brown. Let cookies cool completely.
  6. Makes 1 1/2 dozen cookies.
Schema/Recipe SEO Data Markup by ZipList Recipe Plugin
http://www.bakenoprisoners.com/wordpress/index.php/flourless-sugarless-gluten-free-peanut-butter-cookies/

DSC02175_600x400

One Blogger’s Reflection

DSC01986_600x400

Over the past few weeks I have been revisiting a few of my older posts on BNP and it has got me thinking…

What have I learned since I started BNP 2 years ago?

This post has me evaluating my blogging adventures…

I laugh when I think back about how I thought it was just was easy as bake, blog, and repeat. While yes, that is the very basic outline to a blog, there is so much more to take into consideration:

1. Photography

2. Photoshop

3. Creative writing

4. Social media outlets

5. Getting your voice heard

6. Recipe pride

7. Consideration of others

8. Baking ability

9. Decoration

10. Background

None of which are in any order of importance. In fact, they must all work cohesively in order to be successful.

I may be strong in a few, but I am definitely still learning and publicly stumbling in many others. So that is essentially what the last two years have been:

A learning experience.

Things I have learned:

1. First and probably the most important lesson I have learned thus far is to be considerate of other bloggers.

When I first started, I faced blogging like I might teaching. In the teaching world, all ideas are up for grabs.  Whatever activity, lesson, or center reaches the most student success, you go for it. You copy them because you like them. You see their potential. You are not claiming them as your own, but you are not always putting your own stamp on it so to speak. I used to just copy the entire recipe from a blog I admired, tag them, and recreate the recipe. I might have changed one or two things to give it a slightly different spin, but it was, for all intents and purposes, someone else’s recipe. Someone else’s hard work and dedication. As I now create my own recipes and write down my own experiences, I realize just how much pride I have in each post and how demoralizing it would be if someone claimed it as their own. So now in the blogging world, if I love something enough to put it on my blog, I send my viewers straight to the source.

2. Photography (and Photoshop for that matter) are learned skills.

Practice makes perfect and I must have several hundred of horrid, fuzzy pictures to prove it. When Mr. BNP first got me my Sony NEX-5N, my initial thought was, Ooooh Kaaaay, I have a smart camera that will do everything I need it to with just a click of a button. I couldn’t have been more wrong. The most important rule I have learned about photography is to shoot EVERYTHING in manual mode. When you do that, then you can adjust the aperture and shutter speed. Do not, I repeat, do not think that choosing the Intelligent mode will get you what you want out of your photos. Study your manual. Watch how to videos. Talk with others who have been there. And invest in a good photography light box. This one is mine. Adorama Photo Studio In-A-Box. Photos are important. Add as many great photos as you can to your post. Most people enjoy photos more than the actual post.

3. Writing is the hardest part.

I am a complete introvert. I am shy to new people and new experiences and will most likely stutter or stumble upon my words when first meeting you. Corner me and I am like a turtle crawling back into her shell.  Now times that anxiety by ten when I have to write my personal experiences and share my own recipes to the world. Ok, so I know not the whole world. But it is out there for anyone to see. People who like me. People who don’t. People who have just found me. making their first impressions of me. It is intimidating and I am deathly afraid of failure. That being said, I am conquering my fear each week with a new post and that is saying something.

4. Social media outlets and getting your voice heard go hand in hand.

There are so many social media outlets to get your blog noticed that it is hard to choose which one. I am a huge fan of 3 and am constantly updating them; Facebook, Twitter, and Instagram. I do have a Google+ account, Pinterest, LinkedIn, and many more, but I just can’t keep up. Even my Pottermore account is being left in the dust these days. Point is, I have learned that you have to put yourself out there. Introduce yourself. Share. Share. Oh yeah, and share some more.

5. Baking ability, decoration, and background

I have grown so much as a baker since beginning Bake No Prisoners. I attribute my growth to fellow bloggers, decorating classes, and trial and error. There is nothing I hate more than spending time and money on a recipe that turns out to be a total disaster, but those failures aid in future successes. They are necessary. I promise. You will succeed as long as you keep trying.

The background to your photos is almost as important as the baked goods itself. Invest in a few adorable cake stands, bottles, and background paper. Michael’s is perfect for this. T.J. Maxx and Homegoods are great sources too. If you like to order online, check my links page, under supplies.

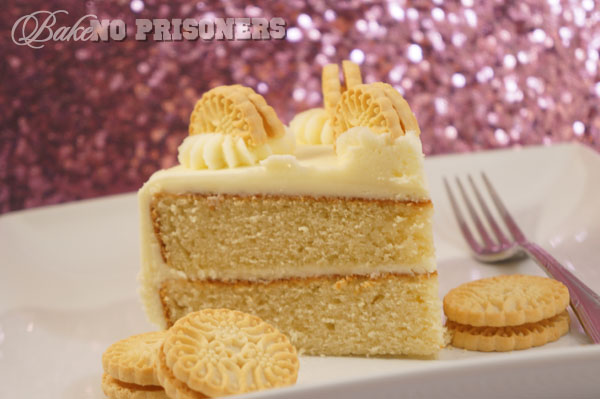
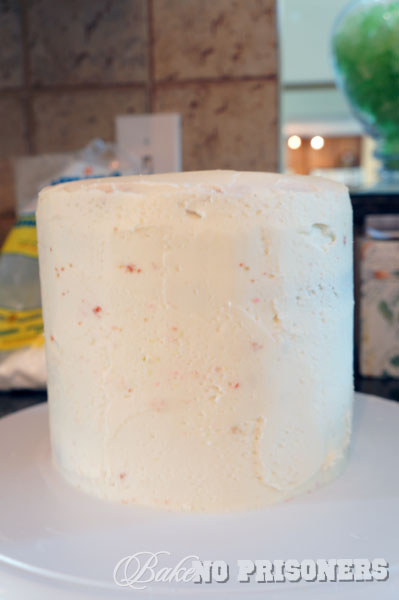
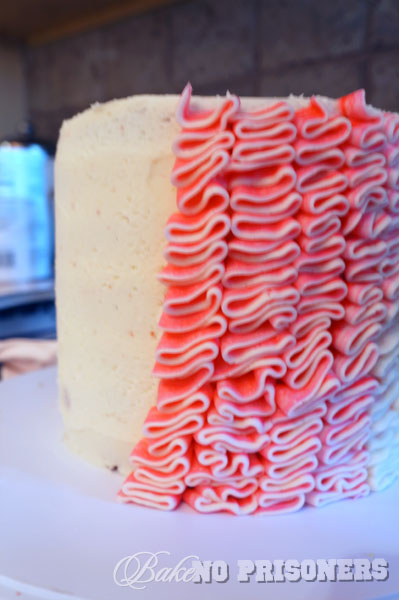
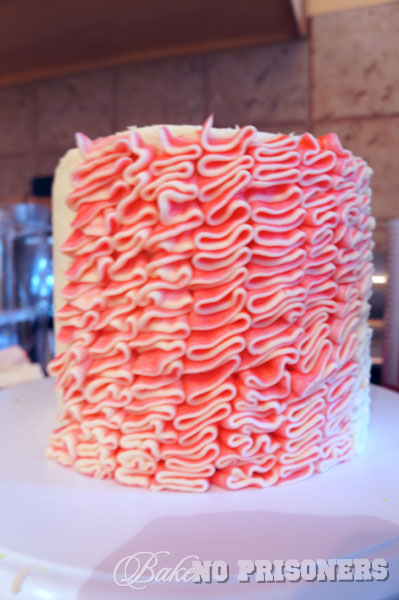
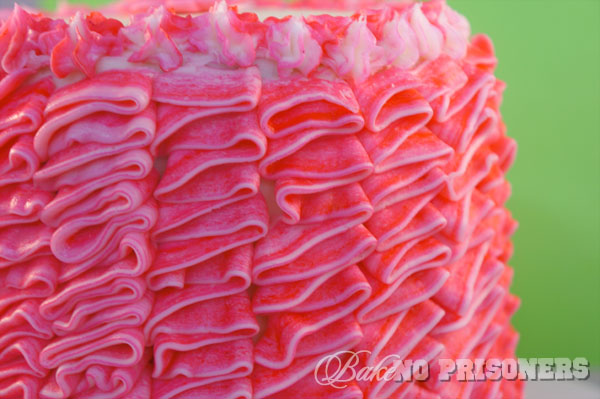
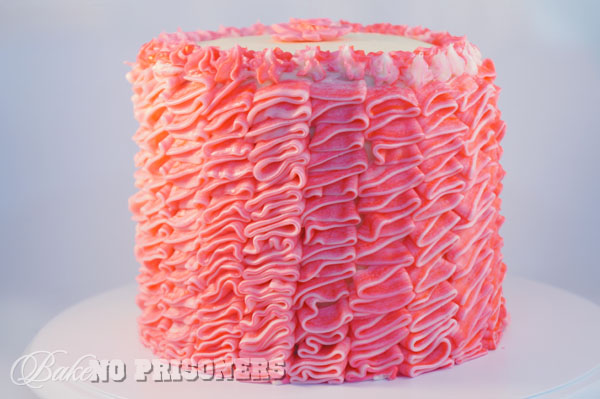
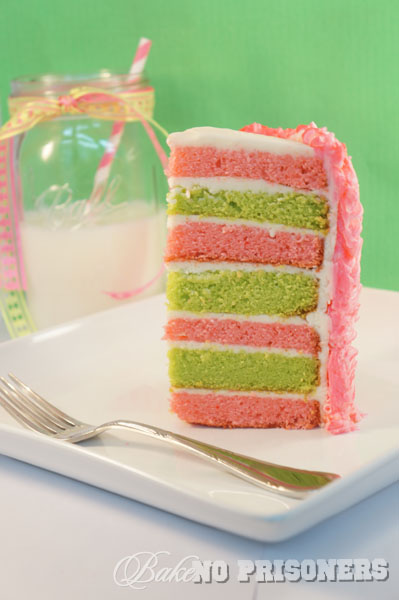
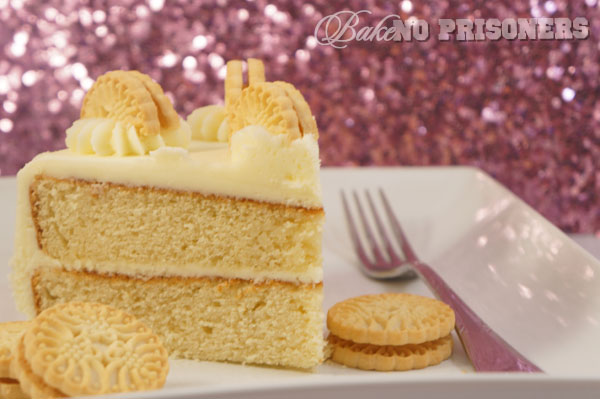
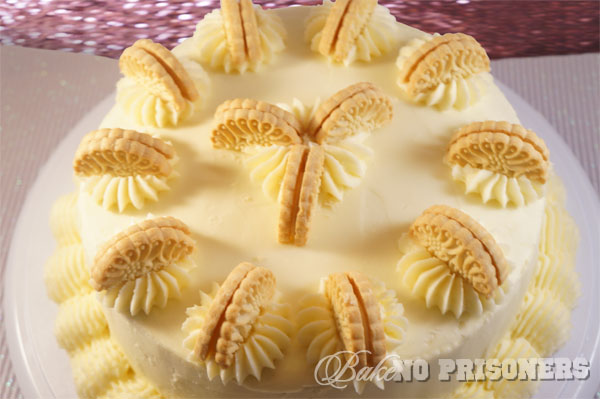
Now this post isn’t just a long and drawn out blogger’s reflection, I also have an adorable, Girl Scout themed cake for you!

DSC01972_600x400

Another perk of being a teacher is that you have an excuse to buy an exuberant amount of Girl Scout cookies. Whether your favorite be Thin Mints, Samoa, or Tagalongs, you have to admit, those Girls Scouts really know how to make a good cookie.

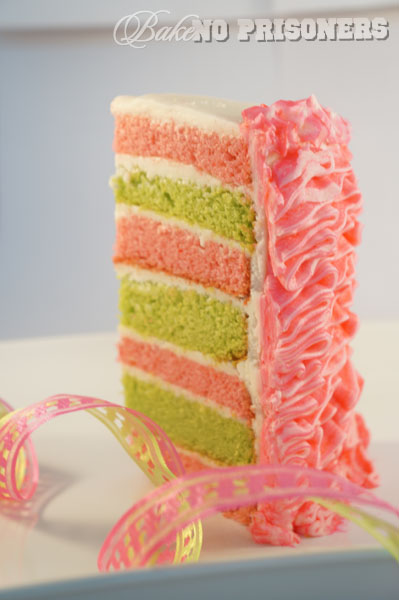
They have a new flavor this year called the Mango Cremes cookie. According to the box, these cookies are “Vanilla and coconut cookies filled with a tangy mango flavored creme.” This sounded like the perfect opportunity to turn this cookie into a cake!

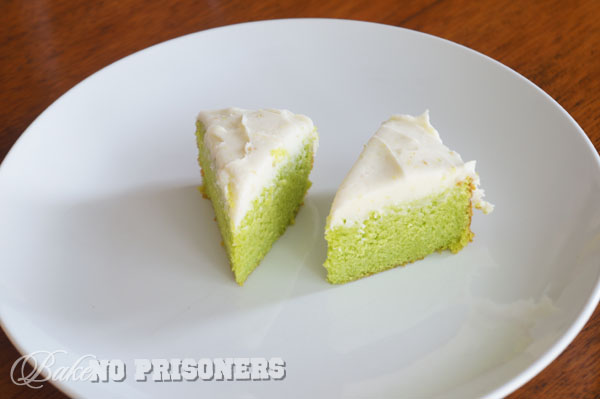
Now the Hubster is allergic to coconut flakes, so I used flavoring in the cake recipe, along with vanilla, but you could totally find a way to add coconut flakes to your cake or frosting.

DSC01947_600x400

I used this basic vanilla cake recipe for the base, but cut the vanilla in half and used coconut flavoring in its place. I really like this vanilla cake recipe because it produces a firm cake that is perfect to frost.

This Mango Coconut Buttercream makes this cake! It is thick and creamy and oh so tropical! When I slice a piece of this cake, I pretend I am in the Caribbean somewhere and away from all this cold, dreary weather! Enjoy!

Mango Coconut Buttercream Frosting

Recipe by Carrie

Ingredients

  • 2 sticks softened butter
  • 1 lb. confectioners' sugar
  • 1 Tablespoon meringue powder
  • 1 teaspoon coconut flavoring
  • 4 teaspoons milk or heavy cream
  • 5 teaspoons mango juice

Instructions

  1. Cream butter, coconut flavoring, and milk. Add dry ingredients a little at a time. Mix on medium speed until creamy, about 5 minutes.
Schema/Recipe SEO Data Markup by ZipList Recipe Plugin
http://www.bakenoprisoners.com/wordpress/index.php/a-bloggers-confession/

DSC02002_600x400


Ribbon Cake Tutorial

DSC01813_600x400

I hope everyone had a lovely Valentine’s Day last week! What did you guys do?

Did anyone have something special planned?

A trip, maybe?

Every year, the Hubster makes cheese fondue at home for me because I don’t like to go out to dinner too often, especially on holidays.  He makes the best fondue you guys!! We dip apples, bread, and veg until our tummies are about to bust and then we find room for dessert.

This year, I thought I would try and spice things up with this neon pink and green, cotton candy ribbon cake. It is seven layers of cotton candy goodness, with neon pink ribbon frosting from top to bottom. First rule of thumb when decorating a ribbon cake is that this is totally easier than you think it is going to be. I want to take you guys through it, step-by-step, just to prove to you how simple this cake was to decorate.

DSC01775_600x400

First, take your favorite cake recipe and make 2 8 in. rounds. In this case, I made one electric pink and the other neon green. You can use the basic vanilla cake recipe I have posted before and just half the vanilla with your favorite flavoring. Or in my case, I used the cotton candy flavoring oil at Layer Cake Shop. Use any flavoring oil very sparingly, a few drops is perfect.

Once completely cool (I store mine in the refrigerator for an hour or so) level each cake and then slice each cake in thirds. You can use a cake leveler if you want, but for this cake, I just eyeballed it. You can tell my layers aren’t exactly perfect, but that’s ok with me.  Frost in between each layer with your favorite buttercream, starting and ending with a pink layer.

DSC01781_600x400

Once you have layered and assembled your cake, crumb coat your cake and place back into the fridge for an hour or even overnight. Crumb coating makes it a lot easier to frost a cake because once refrigerated, you don’t have to worry about getting crumbs in your frosting. It also aids in keeping your frosting straight and  level. I normally put mine in the fridge overnight because I just don’t have the time to bake, crumb coat, and frost a cake in an average day.

DSC01790_600x400

I took the last green layer and frosted it for the Hubster to snack on or bring to the office.

Sometimes our furry house elves get a little bite too!

DSC01806_600x400

Take your pastry bag and attach your coupler and tip 103 or any rose tip you have and place the bag into a tall glass. To give it  more of a ribbon candy look, I dripped my electric pink food coloring down the sides of the bag before placing the frosting inside. That way, when I started to pipe the frosting, my ribbons would come out looking like this.

DSC01810_600x400

You want to make sure you are holding your pastry bag vertically against the side of the cake, starting at the bottom, and move in a horizontal 1 inch direction, back and forth. You want to try to keep your lines straight, but it is totally ok if you start to slant like me. You can make it up on the next line of ribbons. Remember, practice makes perfect.

DSC01811_600x400

See! They are much straighter now from this view. Go around the entire cake making 1 inch ribbons from bottom to top.

DSC01814_600x400

Finally, I used a star tip to pipe a small ring of stars around the top to hide any mistakes and to bring together the ribbons with the top of the cake.

DSC01849_600x400

I also added a pink royal icing flower in the middle I had made previously.

DSC01846_600x400

Neony and bright….just ready to be cut into and eaten!

DSC01855_600x400

We ended up splitting one piece between the two of us!

DSC01898_600x400

By the way, this is what the Hubster got me for Valentine’s Day! SQUUUUEEEEE!!!

 Limited Release Disney Couture Ear Hats Kick off the 'Year of the Ear' at Disney Parks

*This is from Disney’s  January 2013 Year of the Ear. They are introducing 5 new limited release Disney Couture Ear Hats each month.

Warning: Valentine Fabulousity

I have got so much going on for you guys in this post that I might just explode with excitement!!

First off, let me tell you that I am not your average valentine.

I don’t like flowers.

I don’t do expensive jewelry.

I don’t even like to go out to dinner.

Weird? I know. But in our house, we like to make each other something to celebrate Valentine’s Day.

(Supposedly the hubster is secretly working on a glowing Doctor Who sign for me…SQUEEE!! What else could a girl possibly want?!)

So I have made you guys something fabulous to show how much you are loved!

Lovey Mantels

DSC01662_600x400

This year I noticed several blogs out there decorating their mantels for the day of L-O-V-E. Amanda Jane Brown was probably my favorite and she gave me a ton of ideas and inspiration for my own mantle. I plan to fill the red picture frame with a valentine print from the awesome Becky Higgins.

DSC01704_600x400

I adored Amanda’s idea of valentine M&M’s in mason jars and I added a junky striped straw to mine to give them a bit more whimsy.

I also love the mustache epidemic that is spreading across the nation. Anybody else? I especially love my hanging heart in the background with its little black handlebar mustache. I think it ties in nicely with the black feather boa that is draped across the mantle.

DSC01650_600x400

I used my apothecary jar to hold the leftover pink and white marshmallows I had after I topped my triple chocolate brownies with them.

For the wreath, I cut a heart out of Styrofoam and hot glued artificial carnations in various shades of red, pink, purple, and white. I also secured some pretty ribbon in the back, so I could hang it up.

DSC01653_600x400

This heart banner was so quick and simple to put together. I found the hearts, twine, and mini-clothes pins at my local craft store. For the background, I just ripped out pages from an old book, trimmed them up, and round the corners. Then I just glued the hearts in the center of the book page and hung them up.

Chocolate Covered Peep Hearts

DSC01508_600x400

You heard me right….I found heart shaped, vanilla Peeps, dipped them in milk chocolate, and sprinkled them with love.

From me. Just for you.

DSC01503_600x400

Don’t you LOVE my new Mickey coffee mug?!?!?! Ahhhhh… I die.

Triple Chocolate Marshmallow Brownies

DSC01475_600x400

Chocolate is the only tradition I keep when it comes to Valentine’s Day…and these brownies are diabolical…choco-magical if you will…and I am totally quoting someone who recently ate these when I say this.

Triple Chocolate Marshmallow Brownies

Recipe by Carrie

Ingredients

  • 3 ounces semisweet chocolate
  • 2 ounces bittersweet chocolate
  • 2 ounces unsweetened chocolate
  • 3 tablespoons cocoa powder
  • 1 stick butter, softened, cut into quarters
  • 3 large eggs, room temperature
  • 1 1/4 cups sugar
  • 2 teaspoons vanilla extract
  • 1/2 teaspoon salt
  • 1 cup all purpose flour

Instructions

  1. 1. Preheat oven to 350 degrees. Spray an 8 in. pan with nonstick cooking spray and line with 2 sheets parchment paper perpendicular to one another. Push paper down into the corners, but allow it to hang over the sides.
  2. 2. In a double boiler, melt all chocolates and butter until smooth. Whisk in the cocoa until blended. Set aside to cool.
  3. 3. Combine the eggs, sugar, vanilla, and salt in your free standing mixer for 30 seconds. Add the chocolate mixture into the egg mixture until incorporated.
  4. 4. Add the flour in two batches until just blended.
  5. 5. Pour the mixture into the prepare pan and spread evenly into the corners.
  6. 6. Bake until slightly puffed and when a toothpick inserted comes out with a few sticky crumbs, about 35-40 minutes.
  7. 7. If adding marshmallows, take out at 30 minutes, add marshmallows, and bake for an additional 5 minutes or until marshmallows have puffed up.
Schema/Recipe SEO Data Markup by ZipList Recipe Plugin
http://www.bakenoprisoners.com/wordpress/index.php/warning-valentine-fabulousity/

DSC01496_600x400

As a teacher, it is my academic duty to be totally up to date on all the latest toys, dolls, and video games(at least, that is what I tell myself when I am perusing the toy department)…..soooo my mini lalaloopsy doll just had to make an appearance on the blog.

Underwater Basket Weaving

It seems like it has been a lifetime since I have lived in Florida, but in reality, it has been a short 7 years. I don’t necessary miss living in Florida. I really only miss my family and Disney, but I am spending the weekend down here because my Mom had a procedure done and I wanted to be here for her during her recovery. It is an hour long drive from her home to the hospital, and as I drive each day, I get to pass by my entire childhood….

The Clearwater beaches where I spent many a day after school soaking up the Florida sun (it is also where Winter the dolphin is located and the famous Frenchy’s, with the best grouper sandwich…EVER. Period.)

My High School, one of the many places where I discovered my love for writing, as well as the realization at how geeky I really was….er…am.

My first home with the Hubster, a cozy little condo overlooking the water with all the comforts of civilization at our fingertips…not a cow in sight…

Posted signs for the Florida State Fair…oh, how I miss you fried everything…

And of course, Florida drivers….I can say that, because I am one of them. But when you gather them all in one place and then mandate the speed limit to 35mph, I go crazy…bat crap crazy….

I could go on….but I would rather show you what I have been working on this week…

   DSC01460_600x400

I have been taking a class to hone in on those decorating skills that I seem to be lacking in the cake department.

This is my final project.

DSC01455_600x400

I made the button flowers out of neon fondant and gum paste.

All you do is combine a little larger than a golf ball size of gum paste with a quarter size ball of neon fondant until well blended. Dust your flower press with a combinations of cornstarch and confectioner’s sugar, roll out your fondant according to the directions, and press down. Hard. Really hard. You also have to use a little tool that sort of looks like a plastic pencil to slowly score the underside to get it out of the press, but it is fairly easy.

Frosting the basket weave took a little more time to master. Thus, the title of this post…Underwater Basket Weaving.

DSC01466_600x400

If you are part of my generation or earlier, you know what I am taking about. This idiom typically refers to a college elective one might take to improve their GPA. It is suppose to reference an easy course or one that would take little effort. That is not the case when it comes to basket weave frosting….although, once I got the hang of it, it went pretty quickly.

Pretty and tasty? Now that is a cake I can live with….

*Recipe Info: Easy Breezy Chocolate Cake

*Buttercream Icing