Triple Chocolate Stout Whoopie Pies

Triple Chocolate Stout Whoopie Pies

I love holidays…

I mean, seriously, who doesn’t?!

In order, my favorites are:

In first place, Halloween

Then, Thanksgiving

Christmas

St. Patrick’s Day

Flag Day (my birthday)

Easter

Valentine’s Day

And dead last, New Year’s Eve

Plus, any holiday where I get the day off from school makes the list too, President’s Day, Martin Luther King, Jr.–even snow days are included.

I love holidays because they are normally full of family, tradition, and food…I am typically the one in the kitchen surrounded by the ones I love, cooking or baking a recipe that has been handed down for ages or at the very least, expected each holiday.

St. Patrick’s Day is no exception.

Every year, I ask the Hubster if we can go out to the local Irish pub for someone else’s homemade Irish fare and every year he says, but what about our traditional black and tan corn beef sandwiches…and my fried potatoes and turnips…and my Irish creme pound cake….

I can just see his lower lip quivering now. ;) Just kidding.

So every year, while jamming out to Flogging Molly, I cave and make just the two of us, our Black and Tan corn beef sandwiches with fried potatoes and turnips, and my Irish creme pound cake for dessert.

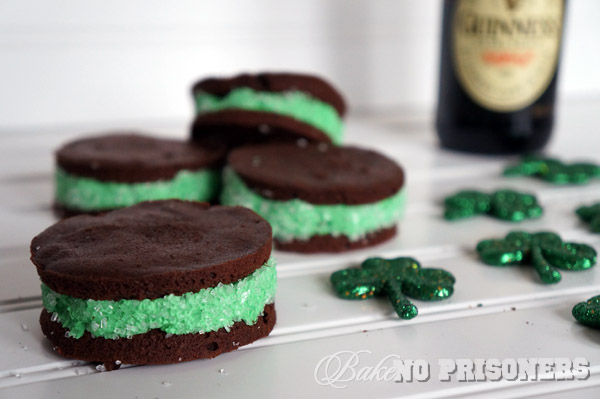
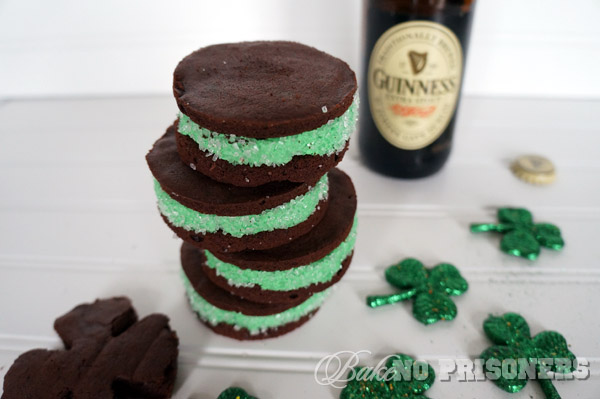
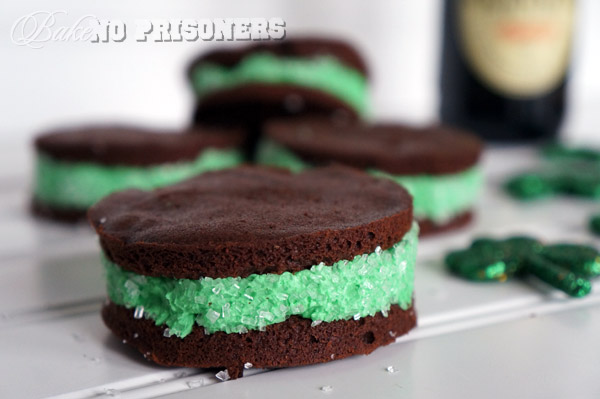
This year, I am adding these adorable Triple Chocolate Stout Whoopie pies to the mix.

Triple Chocolate Stout Whoopie Pies

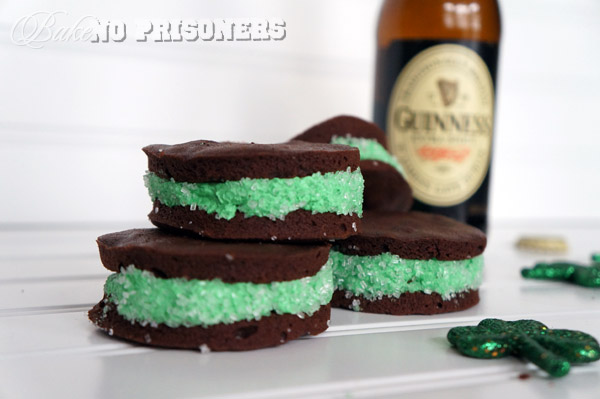
These whoopie pies are so rich and chocolatey and so easy to put together!

Triple Chocolate Stout Whoopie Pies

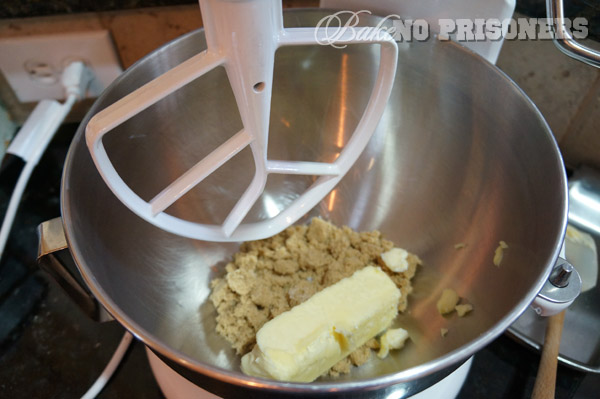
To start, I always make sure to cream my butter and sugar until light and fluffy.

Triple Chocolate Stout Whoopie Pies

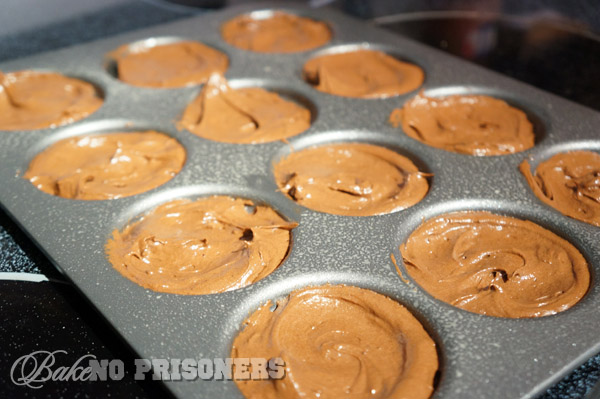
I just happen to have a Whoopie Pie pan, but if you don’t, then just scoop a 1 1/2 tablespoons of batter onto your cookie sheet.

Triple Chocolate Stout Whoopie Pies

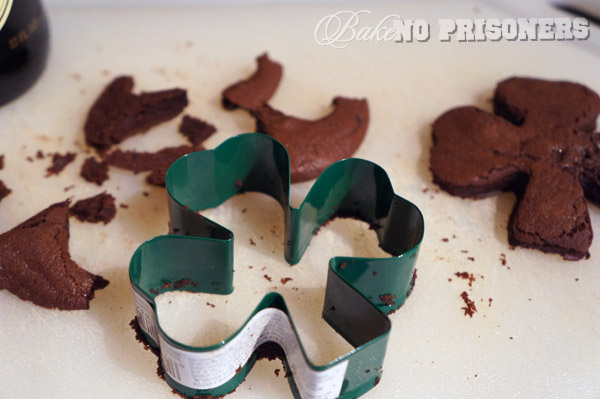
I even made a few pies in the shape of a shamrock using a cookie cutter.

Triple Chocolate Stout Whoopie Pies

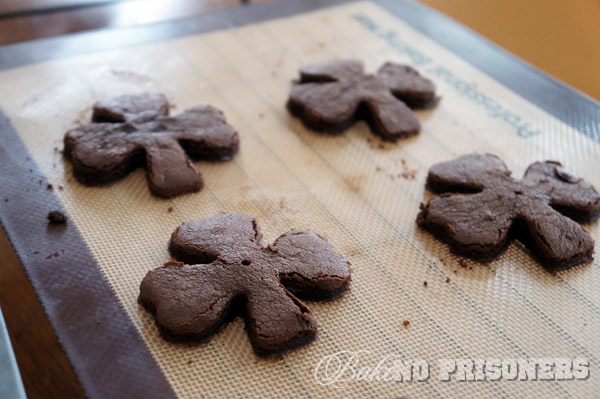
They can be very fragile, so make sure you allow them to cool completely before assembling.

Triple Chocolate Stout Whoopie Pies

Triple Chocolate Stout Whoopie Pies

Recipe by Carrie

Ingredients

  • 1 cup flour
  • 2 ounces semi-sweet chocolate
  • 2 ounces unsweetened chocolate
  • 1/2 cup Dutch process cocoa powder
  • 1/2 teaspoon baking soda
  • 1/4 teaspoon salt
  • 3/4 cup firmly packed light brown sugar
  • 8 tablespoons (1 stick) unsalted butter, room temperature
  • 2 eggs, room temperature
  • 3/4 teaspoon vanilla extract
  • 1 cup heavy cream
  • 1/4 cup Guiness Extra Stout

Instructions

  1. Preheat oven to 325 degrees. Grease and flour the wells of your Whoopie Pie Pan or get out your cookie sheet and line it with parchment or a silapat.
  2. In a bowl, whisk together the four, baking soda, and salt; set aside.
  3. Combine your semi-sweet and unsweetened chocolate in a microwave safe bowl. Heat for 1 minute and then stir. Continue to microwave for 30 second increments until completely melted; let cool.
  4. Once cooled, add cocoa and cream and whisk together. It may seem a bit lumpy.
  5. In the bowl of a stand mixer, beat together the brown sugar and butter on medium speed until combined; about 1 minute.
  6. Add the vanilla and the eggs and beat until fluffy.
  7. Reduce the speed to low and add your chocolate mixture. Mix until combined.
  8. Add your flour mixture in 2 additions, alternating with the Guiness Extra Stout; beginning and ending with the flour mixture.
  9. Beat until each addition is incorporated, stopping occasionally to scrape the sides of the bowl.
  10. Fill each well or cookie sheet with 1 1/2 tablespoons of batter.
  11. Bake for 8 to 10 minutes or until a toothpick inserted into the center comes out clean.
  12. Let cool cool completely before frosting.
  13. Frost with your favorite marshmallow butter cream and roll in sugar crystals.
Schema/Recipe SEO Data Markup by ZipList Recipe Plugin
http://www.bakenoprisoners.com/wordpress/index.php/triple-chocolate-stout-whoopie-pies/

Triple Chocolate Stout Whoopie Pies

Doctor Who Valentines That Will Melt Even the Doctor’s Two Hearts {Free Printable}

I love the fact that as a teacher, I get to participate in the yearly Valentine’s Day exchange of candy and cards.  At the beginning of February, I take to the local card shops and try to find the best valentine that represents me and my favorite things. Last year it was totally Harry Potter all the way. I thought this year I might do something Hunger Games related, but lately I have been really into catching up on all of the old Doctor Who reruns. So last week I finally decided I wanted to pass out Doctor Who valentines to all the kiddos. When I couldn’t find any, I thought why not make them?!?

Here is my take on how the Doctor, Oods, Daleks, and the TARDIS would celebrate Valentine’s Day…if they could…

DrWho-02

I am so excited on how my TARDIS came out. I only had to draw it once (unlike my Ood) but I think it turned out brilliant!

DrWho-04

Here is my Ood…I changed his second brain into a heart for Valentine’s Day!

DrWho-05

My Valentine Dalek has chosen to say INFATUATE instead of EXTERMINATE!

DrWho-03

I have my bag packed in case the Doctor ever shows up with the TARDIS…

Feel free to save and print, fellow Doctor Who fans! If you plan to share or post online, please take a moment to give credit and attribution to the source of origin. To print, click on the link below and save or print “WhoValentines” on heavy bright white paper. Print at 100%, feel free to scale.


WhoValentines


Oh, and if you’re looking to find out how to write your name (and more) in Gallifreyan, then you MUST check out Sherman’s Planet. He’s created a guide on how to translate anything into the language of the Time Lord. Tricky? Yes….but totally worth it!

I am still working on my name, but I will share it once it is completed!

Warning: Valentine Fabulousity

I have got so much going on for you guys in this post that I might just explode with excitement!!

First off, let me tell you that I am not your average valentine.

I don’t like flowers.

I don’t do expensive jewelry.

I don’t even like to go out to dinner.

Weird? I know. But in our house, we like to make each other something to celebrate Valentine’s Day.

(Supposedly the hubster is secretly working on a glowing Doctor Who sign for me…SQUEEE!! What else could a girl possibly want?!)

So I have made you guys something fabulous to show how much you are loved!

Lovey Mantels

DSC01662_600x400

This year I noticed several blogs out there decorating their mantels for the day of L-O-V-E. Amanda Jane Brown was probably my favorite and she gave me a ton of ideas and inspiration for my own mantle. I plan to fill the red picture frame with a valentine print from the awesome Becky Higgins.

DSC01704_600x400

I adored Amanda’s idea of valentine M&M’s in mason jars and I added a junky striped straw to mine to give them a bit more whimsy.

I also love the mustache epidemic that is spreading across the nation. Anybody else? I especially love my hanging heart in the background with its little black handlebar mustache. I think it ties in nicely with the black feather boa that is draped across the mantle.

DSC01650_600x400

I used my apothecary jar to hold the leftover pink and white marshmallows I had after I topped my triple chocolate brownies with them.

For the wreath, I cut a heart out of Styrofoam and hot glued artificial carnations in various shades of red, pink, purple, and white. I also secured some pretty ribbon in the back, so I could hang it up.

DSC01653_600x400

This heart banner was so quick and simple to put together. I found the hearts, twine, and mini-clothes pins at my local craft store. For the background, I just ripped out pages from an old book, trimmed them up, and round the corners. Then I just glued the hearts in the center of the book page and hung them up.

Chocolate Covered Peep Hearts

DSC01508_600x400

You heard me right….I found heart shaped, vanilla Peeps, dipped them in milk chocolate, and sprinkled them with love.

From me. Just for you.

DSC01503_600x400

Don’t you LOVE my new Mickey coffee mug?!?!?! Ahhhhh… I die.

Triple Chocolate Marshmallow Brownies

DSC01475_600x400

Chocolate is the only tradition I keep when it comes to Valentine’s Day…and these brownies are diabolical…choco-magical if you will…and I am totally quoting someone who recently ate these when I say this.

Triple Chocolate Marshmallow Brownies

Recipe by Carrie

Ingredients

  • 3 ounces semisweet chocolate
  • 2 ounces bittersweet chocolate
  • 2 ounces unsweetened chocolate
  • 3 tablespoons cocoa powder
  • 1 stick butter, softened, cut into quarters
  • 3 large eggs, room temperature
  • 1 1/4 cups sugar
  • 2 teaspoons vanilla extract
  • 1/2 teaspoon salt
  • 1 cup all purpose flour

Instructions

  1. 1. Preheat oven to 350 degrees. Spray an 8 in. pan with nonstick cooking spray and line with 2 sheets parchment paper perpendicular to one another. Push paper down into the corners, but allow it to hang over the sides.
  2. 2. In a double boiler, melt all chocolates and butter until smooth. Whisk in the cocoa until blended. Set aside to cool.
  3. 3. Combine the eggs, sugar, vanilla, and salt in your free standing mixer for 30 seconds. Add the chocolate mixture into the egg mixture until incorporated.
  4. 4. Add the flour in two batches until just blended.
  5. 5. Pour the mixture into the prepare pan and spread evenly into the corners.
  6. 6. Bake until slightly puffed and when a toothpick inserted comes out with a few sticky crumbs, about 35-40 minutes.
  7. 7. If adding marshmallows, take out at 30 minutes, add marshmallows, and bake for an additional 5 minutes or until marshmallows have puffed up.
Schema/Recipe SEO Data Markup by ZipList Recipe Plugin
http://www.bakenoprisoners.com/wordpress/index.php/warning-valentine-fabulousity/

DSC01496_600x400

As a teacher, it is my academic duty to be totally up to date on all the latest toys, dolls, and video games(at least, that is what I tell myself when I am perusing the toy department)…..soooo my mini lalaloopsy doll just had to make an appearance on the blog.

A Homemade Christmas

Busy. That is the word I have been using lately as to why I haven’t been posting as much.  It’s not that I don’t love my very small group of amazing followers(mostly family…thanks Mom), but the holidays are here in full swing at my house.  And on top of my already lovely and fabulous full time job, I have been in the process of hosting Thanksgiving, Christmas parties, and cookie exchanges for the last several weeks.

Oh..and I also make my own Christmas cards.

This is a tradition that a few of us ladies started last year. My creative friend Laurin, has us all over at her house (this year with a brand new babes in tow), whips up a few appetizers, opens a bottle of wine, and for the next several hours, shows us amateurs how to slice, dice, stamp, and bow tie our very own Christmas cards.

This is the before view of our craft table.

30 minutes in and my first card is complete…14 more to go…

The infamous and ever so lovely Laurin.

After you get about halfway through the cards, you begin to get a bit delirious(or tipsy) and start sticking the jewels to your forehead instead of the card, thinking that it might just be easier to mail yourself. I kid.

Stamping is messy. I was washing that stuff off for days. I don’t kid.

If you are one of the lucky 15 to receive one of these cards, then you now know how much hard work and love(and a few tears..) went into them…don’t throw them away! Merry Christmas and Happy Holidays!

Halloween Bark

I. LOVE. H A L LO W E E N.

It is my favorite holiday of the year! I mean, what’s not to love…

FREE Candy, costumes, haunted houses, classic horror films…the list goes on and on…

Let me break it down for you on how we celebrate Halloween in our house…

Around the end of September is when I drag out the 4…yes…4 bins of Halloween decorations for the inside of the house alone. I am talking pumpkins of all kinds, owls, frogs, ghouls candles, and much more. Then a few weeks before the sacred holiday we tackle the decorations for the outside of the house. This includes a pumpkin trail all the way down my stoop. Some of the pumpkins have been bejeweled, some have ribbon, and some are even lighted. And speaking of lights, I have pumpkin lights in the bushes and  purple and green string lights wrapped around my banister. Oh and the cobwebs! YES! The cobwebs are EVERYWHERE!!

So a week before Halloween, the hubster and I go and visit the pumpkin patch and I pick out the biggest and roundest pumpkin I can find. When we get home, we figure out what design we are going to carve out on our pumpkin and then break out the dremel. Yes, I do have my very own orange, pumpkin dremel just for this occasion. Once we are done we toast the pumpkin seeds just like Mom used to.

Another favorite Halloween tradition is coming up with yummy treats to bring to the kiddos at school. I loved surprising them last year with butter beer cupcakes during our book character dress-up extravaganza,  in which our class had chosen Harry Potter and the Chamber of Secrets. This year we chose Harry Potter and the Goblet of Fire, my all time favorite book and movie of the Potter series. Our book character dress-up isn’t for a few more weeks, but I wanted to get the kiddos excited for the upcoming events, so I made this all too simple Halloween bark.

All you need are some fun sugar cookies, melted white chocolate, candy corn, crushed pretzels, and fun sprinkles!

Directions:

1. Layer the sugar cookies on a wax paper coverage cookie pan. Make sure your pan has some sort of lip on it to keep the melted chocolate in.

2. Melt your chocolate candies according to the package and spread over the cookies, filling in the gaps and edges.

3. Layer your candy corn, crushed pretzels, and sprinkles on top and let it firm for about 30 minutes.

4. Flip over and remove wax paper.

Break into pieces and serve!

And just for fun…