Baby Blackberry Cobblers

Baby Blackerry Cobblers

I love when my Mom comes to visit. She lives about 700 miles away, so when we get to see each other, we try and make the most out of our short visit. She just so happened to fly up this week to help me set up my classroom for the upcoming school year. But thanks to my awesome organizational skills{surprisingly not sarcasm this time}, it only took us one day to set everything up. Which meant that left us 6 whole days to eat, shop, talk, and of course, bake.

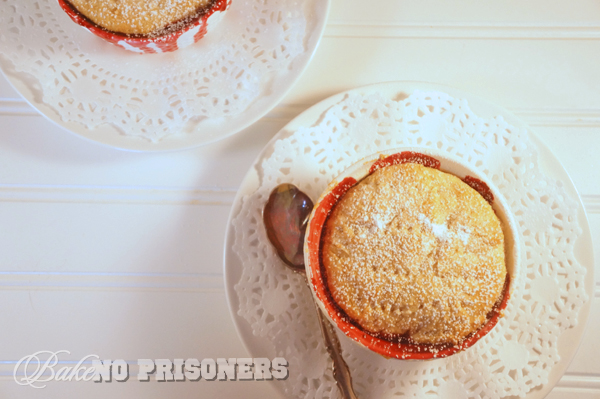
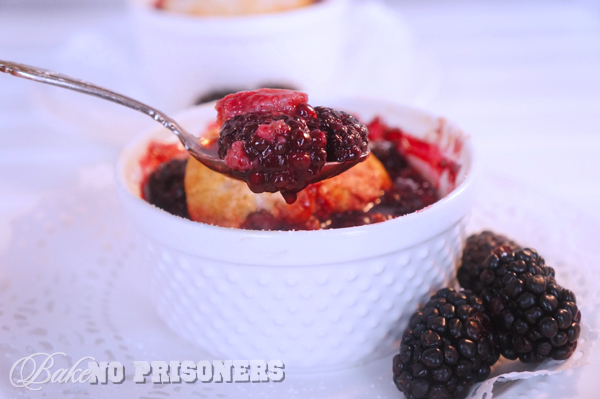
Now I have a slight obsession with blackberries, so I already had it in my head that we were going to make a blackberry post, but it was Momma that came up with the cobbler part. We used her ole southern biscuit recipe for the top crust, and I decided to doctor it up a bit with some baking spice. And then, because I don’t like to share all that much, we used baby cobbler cups, so that we could each have our own.

Baby Blackerry Cobblers

Baby Blackberry Cobblers

Ingredients

    For the biscuit:
  • 2 cups all purpose flour
  • 4 teaspoons baking powder
  • 1 teaspoon salt
  • 4 heaping tablespoons granulated sugar
  • 1/4 teaspoon cream of tartar
  • 1 teaspoon baking spice
  • 1/2 cup butter shortening, cold
  • 7/8 cup milk
  • For the blackberry filling:
  • 12 oz. package fresh blackberries
  • 1 cup granulated sugar
  • pinch of baking spice
  • 3 tablespoons cornstarch
  • 1 teaspoon almond extract

Instructions

    For the blackberry filling:
  1. In a medium size bowl, combine blackberries, sugar, baking spice, cornstarch, and almond extract.
  2. Using a large spoon, gently mix together and then mix again every 15 minutes or so to ensure that all the ingredients have been combined.
  3. The filling will need to marinate for about 45 minutes, so now you can get started on the biscuits.
  4. For the biscuit crust:
  5. Preheat oven to 400 degrees and like a cookie sheet with foil.
  6. In a large bowl, combine flour, baking powder, salt, sugar, and cream of tartar.
  7. Using a pastry cutter, cut in your shortening until your flour mixture looks like wet sand and has pea-sized dough bits.
  8. Add most of the milk and mix with a fork; if your dough is still very dry, add the rest of the milk.
  9. Mix only until the ingredients come together; don't overwork your dough.
  10. Pat out your dough on a well floured surface.
  11. Roll out your dough to about a 1/2 inch thickness.
  12. Using your baby-cobbler dish, flip it over and cut out your dough into a circle.
  13. Make sure to use your fork to poke holes in the dough circle before assembly.
  14. To assemble your cobbler:
  15. Fill your baby-cobbler dish all the way to the top with your blackberry filling.
  16. Carefully lay your biscuit crust on top of the filling.
  17. Brush the top of your biscuit with butter and sprinkle with sugar.
  18. Place baby-cobblers on your cookie sheet to prevent dripping.
  19. Bake for 20 minutes and let cool completely before serving.
Schema/Recipe SEO Data Markup by ZipList Recipe Plugin
http://www.bakenoprisoners.com/wordpress/index.php/baby-blackberry-cobblers/

Baby Blackerry Cobblers

Dark Chocolate Espresso Cakes with Fluffy Peanut Butter Frosting

Dark Chocolate Espresso Cupcakes with Fluffy Peanut Butter FrostingLast weekend a few friends and I headed up to New York City for a girl’s getaway. It was my first time in New York and it just so happened to be restaurant week. So we literally ate and drank our way through the city and picked up 2 Broadway shows along the way.

Our trip started out early Thursday morning. We checked in at our hotel, found a local eatery for an egg sandwich, and headed down Broadway for some shopping and sight seeing. We ate lunch at the amazing Craft Bar and thanks to restaurant week, I was able to have three delicious courses with a blueberry peach parfait to wrap things up. For dinner, we had reservations at The Lamb’s Club and to wind down the evening, we had drinks at The View courtesy of the Marriot Marquis. If you have never been to The View, it is honestly the coolest place to see a 360 degree roof-top view of the city. The restaurant actually spins, slowly, so that you get to check everything out while you are dining.

Friday morning we were able to pick up tickets to Rock of Ages for later that night. After breakfast, we paid our respects to Ground Zero and the Freedom Tower.

Groud Zero

Standing there, among the thousands of names of people who lost their lives on 9/11 is quite humbling and emotional to say the least. My heart goes out to all of you who lost someone on that tragic day and for the ones who are continuing to fight.

The rest of the day included adventures in Chinatown, Chianti in Little Italy, lunch at Mercer Kitchen in SoHo, drinks at Samovar {Russian Vodka Room} and finally, Rock of Ages. I also got to stop by the infamous Junior’s for a slice of Red Velvet Cake. Yeah.

Saturday began with brunch at Sarabeth’s. Yes. THE Sarabeth’s. I have a huge secret crush on Sarabeth’s. I have her jams and her jellies. Her preserves. I even have her cookbook. This was by far my favorite place to eat. I had almond crusted french toast and fried potatoes. So delicious!

Sarabeth's

After brunch, we did a bit more sightseeing, taking in St. Patrick’s cathedral and stopping for drinks at Rockefeller Center. We ate at Carmine’s for dinner before our next Broadway show, Kinky Boots. We had great seats and even got to meet several cast members afterwards. I was in total awe of the cast, the set, and the costumes. I highly recommend it. After the show, we took the Subway back to the hotel for a few hours of sleep before our early flight back home the next day.

So to celebrate my first trip to the big city, I made you fancy Dark Chocolate Espresso Cakes with Fluffy Peanut Butter Frosting.

Dark Chocolate Espresso Cupcakes with Fluffy Peanut Butter Frosting

These cakes are the perfect little treat for any occasion, but I think the espresso and dark chocolate give it more of a New York City feel. Don’t ya think?

Dark Chocolate Espresso Cakes with Fluffy Peanut Butter Frosting

Ingredients

    Dark Chocolate Espresso Cakes:
  • 1 1/2 cups all purpose flour
  • 1 cup sugar
  • 1/4 cup cocoa, fill with hot water to the 1/2 cup line
  • 1 1/2 teaspoons baking powder
  • 1/4 teaspoon salt
  • 1 teaspoon espresso powder
  • 8 tablespoons {1 stick} unsalted butter, softened
  • 1/2 cup sour cream
  • 1 large egg plus 2 large egg yolks
  • 1 1/2 teaspoons vanilla extract
  • 1 cup dark chocolate morsels
  • Fluffy Peanut Butter Frosting:
  • 8 tablespoons {1 stick} unsalted butter, softened
  • 1 cup marshmallow fluff
  • 1/2 cup peanut butter
  • 2 1/2 cups confectioner sugar
  • splash of milk

Instructions

    For the cakes:
  1. Adjust your oven rack to the middle position and preheat oven to 350 degrees.
  2. Line a standard 12 cup muffin tin with baking cups.
  3. In your bowl of a standing mixer, cream butter and sugar.
  4. Add egg and egg yolks, one at a time until incorporated.
  5. Beat in vanilla and sour cream.
  6. Scrape down the sides of the bowl with a rubber spatula and mix again for 30 seconds.
  7. Measure out 1/4 cup cocoa and then add hot water to the 1/2 cup line; stir until it becomes a thin paste.
  8. Add cocoa mixture to your wet ingredients and mix well.
  9. In a large bowl, combine flour, baking powder, espresso powder and salt.
  10. Add the dry ingredients to your wet ingredients, a little at a time, until smooth and no flour pockets remain.
  11. With a rubber spatula, stir in the dark chocolate morsels.
  12. Divide the batter evenly among the cups of the prepared tin.
  13. Bake for about 20 minutes or until a toothpick inserted into the center comes out clean.
  14. Cool completely on a wire rack before frosting.
  15. For the frosting:
  16. In your stand mixer bowl, combine butter, peanut butter, and marshmallow fluff.
  17. On low speed, slowly whip in your confectioner sugar one cup at a time until smooth.
  18. Add a splash of milk as needed to make your frosting creamy and fluffy.
  19. Spread 2 -3 generous tablespoons of the frosting on top of each cooled cupcake.
Schema/Recipe SEO Data Markup by ZipList Recipe Plugin
http://www.bakenoprisoners.com/wordpress/index.php/new-york-city-dark-chocolate-espresso-cakes-with-fluffy-peanut-butter-frosting/

Buncha Crunch Rice Crispy Treats

When we visited the WWOHP last, the Hubs picked up a treat for me from HoneyDukes as we were leaving. It was an extremely large {it took me several days to eat it} rice crispy treat with a thick layer of chocolate on top. It was definitely delicious, but oh so rich. I could only handle a little at a time.

Since then, I have been thinking a lot about that treat. So when the Hubs asked me to recreate it last week, I was totally into it, but I also wanted to put the ole BNP spin on it.

Whenever we go to the movies lately  I almost always buy either a popcorn and M&M’s or my go-to, Buncha Crunch. And we have been seeing a lot of movies lately, which means Buncha Crunch is on my brain, in my mouth, and around the house. So I thought, why not combine my love for Buncha Crunch with my long lost treat from the WWOHP.

Buncha Cruncha Treats

So not only did I put my beloved Buncha Crunch in the everyday, average rice crispy treat, but I also put them on top…Oh yeah, and I drizzled chocolate and peanut butter on top of that. Because.

Buncha Crunch Treats

Buncha Cruncha Treats

Recipe by Carrie

Ingredients

  • 3 tablespoons butter
  • 1 package {10 oz.} marshmallows
  • 6 cups rice crispy cereal
  • 1 cup Buncha Crunch candy, plus more for topping
  • chocolate drizzle
  • peanut butter drizzle

Instructions

  1. Line a 9x13 inch pan with parchment or grease thoroughly with baking spray to prevent sticking.
  2. In a large saucepan, melt your butter on medium heat.
  3. Add your marshmallows and stir until they are completely melted.
  4. Add your rice crispy cereal, 2 cups at a time, and mix well.
  5. Take your rice crispy mix off of the heat, and stir in your Buncha Crunch. Keep in mind that the longer you stir, the more they will melt. I mixed it as quickly as possible before pouring it in the pan.
  6. Pour your rice crispy mix into prepared pan and using a spatula, press firmly until it is level.
  7. Top with additional Buncha Crunch, and let cool.
  8. To make the chocolate and/or peanut butter drizzle, you will need Candy Melts. You can pick them up at any craft store.
  9. Melt the candy according to the package directions.
  10. Using a disposable piping bag or ziploc bag, pour melts into the bag and snip the end.
  11. Drizzle the rice crispy treats with the chocolate/peanut butter both vertically and horizontally.
Schema/Recipe SEO Data Markup by ZipList Recipe Plugin
http://www.bakenoprisoners.com/wordpress/index.php/buncha-crunch-rice-crispy-treats/

Buncha Crunch Treats

Peachy Crumb Cake

I love me some peaches…Being so deep in the South, we have the best peaches all around us. My most favorite type of peach comes from Georgia. They are so juicy and sweet and I absolutely love to bake with them during the summertime. The Hubs is not the biggest fan of peaches, but he will eat them if they are hidden away in a cake. Soooo…

Might I introduce you to Peachy Crumb Cake. {It kinda sounds like a name…doesn’t it?}

Peachy Crumb Cake

Now technically it is a cake, however it is loaded with everything that screams breakfast food, so if you wanted to eat it, like say around 9am or so, then I would think it would be deemed perfectly acceptable. In fact, I made this cake in the morning and had myself a big piece, so yeah, it is totally breakfast worthy.

Peachy Crumb Cake

The secret to this cake is to use ripe, juicy peaches. I would scour the farmer’s markets or local fruit stands to find them. I was lucky and found mine at Trader Joe’s. If they’re firm, just let them sit out for 24-48 hours. You should be able to smell them and they should feel a bit squishy.

Peachy Crumb Cake

Peachy Crumb Cake

Recipe by Carrie

Ingredients

    For peach filling:
  • 5 ripened peaches, coarsely chopped
  • 2 tablespoons sugar
  • For the cake:
  • 2 cups all purpose flour
  • 1 cup granulated sugar
  • 1 teaspoon baking powder
  • 1 teaspoon baking soda
  • 1/2 teaspoon salt
  • 10 tablespoons {1 1/4 stick} butter, softened
  • 3/4 cup whole milk
  • 1 large egg, room temperature
  • 1 teaspoon vanilla extract
  • For the topping:
  • 1/2 cup pecans, chopped fine
  • 3/4 cup brown sugar, packed
  • 3 tablespoons butter, melted

Instructions

    For the peach filling:
  1. In a medium saucepan on medium low heat, add your chopped peaches and sugar.
  2. Let peaches simmer for about 15-20 minutes or until they have almost broken down. Your filling should be thick with small chunks of peaches.
  3. Set aside and let them cool to room temperature.
  4. For the cake:
  5. Preheat your oven to 350 degrees, making sure your oven rack is in the middle position.
  6. Lightly grease the bottom and sides of a 10-inch springform pan.
  7. In your stand mixer bowl, combine butter and sugar and mix until light and fluffy.
  8. Add egg and vanilla to your butter mixture.
  9. In a separate mixing bowl, whisk flour, baking powder, baking soda, and salt.
  10. Starting with your flour mix first, take turns pouring your flour and milk a little at a time, and ending with the flour mix.
  11. Make sure to scrap the sides and bottom of bowl and mix until combined.
  12. For the topping:
  13. In a small bowl, use a fork to combine pecans, brown sugar, and melt butter.
  14. Putting it all together:
  15. Using a rubber spatula, scrape half of the batter into the prepared pan and smooth the top.
  16. Add your peach filling, making sure to spread it evenly and carefully over the batter.
  17. Add the rest of your batter and smooth the top again.
  18. Sprinkle your brown sugar pecan mixture with a spoon or your hands until it is evenly distributed.
  19. Bake until the center is firm and a tooth pick comes out clean, about 50 minutes.
  20. Transfer the cake to a wire rack and let cool completely before serving.
Schema/Recipe SEO Data Markup by ZipList Recipe Plugin
http://www.bakenoprisoners.com/wordpress/index.php/peachy-crumb-cake/

Peachy Crumb Cake

Summery Blue Moon Milkshake

It has been raining for over 14 days here…

14 days…

It is my summer vacation and it has been raining for 1/4 of it. Normally, I love the rain. It is the perfect environment for snuggling with a pup, reading a book, napping with the hubs, or taking on a Harry Potter movie marathon. But now I am over it. OVER IT I SAY.

So I decided to do something about it.

Last week, the hubs was in the mood for a burger, so we took a trip to Red Robin. While he was drooling over which burger to order, I was ogling the drink menu. To be honest, I didn’t make it past the first page. Right there in front of me in glossy card-stock, was a photo of two of my favorite beverages together, intermingled in a tall glass, topped with whipped cream and an orange slice.

I am talking about a beer milkshake here, people. Belgian-style Blue Moon Ale paired with a citrus inspired-vanilla milkshake.

I know what you are thinking….but stop right there.

This milkshake was absolutely delightful and refreshing and I just knew I had to recreate it at home to cure my rainy day blues.

DSC04505_Retouchedps

Thanks to the ad, I already knew that the Red Robin milkshake not only had Blue Moon and vanilla ice cream, but orange liquor as well. So I decided to play up on the orange flavor and add Triple Sec to mine. I also decided to add a little orange juice and orange extract to take some of the bitter taste away from the Blue Moon. And to top off my milkshake, I whipped up a batch of orange flavored whip cream and added an orange slice. {Because every frothy alcoholic milkshake needs a fruit slice.} Am I right? Or am I right?

DSC04574_Retouchedps

This was the perfect remedy for my rainy summer blues. It is like bright, shiny summertime in a cup. It totally makes me forget about the  soggy atmosphere outside my window.

Summery Blue Moon Milkshake

Recipe by Carrie

Ingredients

  • 1 cup Blue Moon Ale or any other orange flavored beer
  • 1/2 cup orange juice
  • 1 1/2 shots Triple Sec
  • 1 teaspoon orange extract
  • 6-8 scoops vanilla ice cream
  • For the orange whipped cream:
  • 1/2 cup heavy cream
  • 4 tablespoons confectioners sugar
  • 1 teaspoon orange extract

Instructions

  1. In a 72 oz. blender pitcher, combine Blue Moon beer, orange juice, Triple Sec, orange extract, and ice cream. Blend until desired consistency.
  2. Add additional scoops of ice cream depending on how you like your milkshake thickness. This recipe call for 6-8, which is of light-medium consistency.
  3. For the orange whipped cream: Combine heavy cream, sugar, and orange extract in your stand mixer bowl. Using your whisk attachment, whisk the cream mixture on medium-high until stiff peaks form.
Schema/Recipe SEO Data Markup by ZipList Recipe Plugin
http://www.bakenoprisoners.com/wordpress/index.php/summery-blue-moon-milkshake/

DSC04568_Retouchedps


Chocolate Cherry Macadamia Nut Cookies

I hope everyone had a wonderful Independence Day! The hubs and I decided to stay home this year, as neither one of us are particularly fond of crowds. Plus, if we really wanted to see some fireworks, then all we had to do was walk outside our front door. It’s that simple thanks to our small town life!

Ok…I don’t typically vent, but this has become a major pet peeve of mine.

So I took the kiddos to our local theme park last Monday for some roller coaster fun. They are old enough to walk around by themselves, so while they were riding rides, I hung out near the pool reading my latest in my long list of must-reads. At one point, I walked up to the concession stand and bought myself a bottled water and fruit cup. Ok…so here comes my pet peeve. The fruit cup was the size of Mt. Everest! No lie. It was big. HUGE.  For $3.99, I had enough strawberries, cantaloupe, and honey dew melon for not just a snack, but also for my breakfast and snack the next day. Not to mention, the size of the “bite-size” fruit pieces had to be cut into 2-3 smaller pieces before I could even put them in my mouth.

Is it not possible to pay $1.99 for a snack size portion of fruit with bite size pieces? Why is it that we Americans have to have the super-size of everything? Or the need to buy the “extra-value” meal? Almost every time the Hubster and I go out to eat, I am asking for a to-go box. Sometimes I remember to eat the leftovers and sometimes I totally forget…thus wasting food aaaand money. I would rather pay a smaller price for a smaller plate. Truth.

WHEW. Alright, I am done ranting. I feel loads better.  Now onto cookies.

DSC04372ps

These cookies are the perfect summer snack. They are crunchy and chewy and who doesn’t love chocolate and cherries together. I was in a total chocolate craze when I came up with the idea. And AND these cookies literally took 15 minutes to put together.

DSC04341ps

I made sure to coarsely chop the cherries and macadamia nuts beforehand to give the cookies some crunch-a-riety.

Yeah. I totally made that word up, but I love it and I’m usin’ it.

DSC04346ps

I love the idea of tart cherries paired with chocolate.

It gives it a nice contrast from the traditional sweet velvety goodness of the chocolate cookie.

DSC04399ps

Chocolate Cherry Macadamia Nut Cookies

Yield: 2 1/2-3 dozen

Recipe by Carrie

Ingredients

  • 3/4 cup butter
  • 1 cup granulated sugar
  • 2 eggs
  • 1 1/4 cup flour
  • 1/2 cup cocoa
  • 1 teaspoon vanilla
  • 1/2 teaspoon baking soda
  • 1/4 teaspoon salt
  • 1/2 cup macadamia nuts, coarsely chopped
  • 1/2 cup tart cherries, coarsely chopped

Instructions

  1. Preheat oven to 350 degrees and line your cookie sheet with parchment paper or a silapat.
  2. In your stand mixing bowl, combine butter and sugar until light and fluffy.
  3. Add one egg at a time to the mixture until well combined.
  4. Add vanilla to your butter mixture.
  5. In a medium bowl, combine flour, cocoa, baking soda, and salt.
  6. Slowly add your flour mixture to your butter mixture, a little at a time until combined.
  7. Fold in your macadamia nuts and tart cherries.
  8. Drop tablespoon sized cookie drops onto your baking sheet and bake for 10 minutes.
  9. Let cookies cool on a wire rack for several minutes.
Schema/Recipe SEO Data Markup by ZipList Recipe Plugin
http://www.bakenoprisoners.com/wordpress/index.php/chocolate-cherry-macadamia-nut-cookies/

Disney, Hogwarts, and Butterscotch Pie

If you have been following me on Facebook or reading my latest posts or haven’t been living under a rock, you already know that the Hubster and I took our vacation to Florida last week.  This was in part to celebrate my birthday, but it was also to visit family and Orlando.

The Hubs and I are total Potterhead-Dizgeeks, so we spent part of our week at Disney’s Epcot and Universal’s Wizarding World of Harry Potter and the other part hanging with the fam.

We decided to hit up Epcot first…

Epcot

In all my years growing up in the bay area, I had never been to Epcot. I know. Total blasphemy.

Family fun

 My brother was able to take off work and join us, so yeah. awesome.

wine tasting

We spent the day going from country to country sampling all the food fare and drinks the world had to offer.

Wine tasting

 Here we were in Germany at a wine tasting. The Hubster is not a big wine drinker, so he got himself a German lager.

Romeo and EdnaWhile walking through Great Britain, we stopped to take in a sidewalk show…the infamous, Romeo and Edna.

It was cheesy and corny and I loved every minute of it. This guy was especially funny.

Me

I totally took advantage of this photo-op in Morocco. I channeled my inner Captain Jack Sparrow for the shot.

The next day we visited The Wizarding World of Harry Potter…

I have read the books a zillion times. Watched the movies a kagillion times. And I have A TON of Harry Potter paraphernalia…über Potterhead right here, ladies and gentleman.

I had already been to the WWOHP once before, but this was the Hubs first time.

Hogwarts

We literally spent most of the day inside Hogsmeade drinking Butterbeer, eating lunch at the Three Broomsticks, and riding with Harry, Ron, and Hermione inside Hogwarts.

ButterbeerI love a good Butterbeer mustache…

clock tower

 I was able to get some really great shots like this one. Every hour, this owl would come out of his tower.

WWOHP

As we were leaving, I was able to get my picture taken with the conductor of the Hogwarts Express.

Hogsmeade

As we walked through, I made sure to take certain shots of the rooftops. This was one of my favorites.

Snitch

I loved the golden snitch above this shop.

And it just so happened that we were in town for Father’s Day last week.

So my Mom and I decided to make my Father’s favorite pie. Butterscotch pie.

This pie is not for the faint of heart…In fact, it is a two person job. It was my great-grandmother’s recipe and my grandmother used to make it for my father when he was little.

So yeah. It is around 200 years old.

Daddy's Butterscotch Pie

This pie will make you work for it, but it is ohhhh so worth it.

Butterscotch Pie

You want your brown sugar mix to boil, but make sure you are stirring constantly to prevent burning.

Butterscotch Pie

Before you put your milk on the double boiler, combine your sugar, cornstarch, flour, and salt in a small bowl.

That way it is ready for when you need it.

Butterscotch Pie

After you have combined the milk mixture with your butterscotch, pour into your baked pie shell and top with meringue.

Butterscotch Pie

Ingredients

  • 1 cup dark brown sugar
  • 1/4 cup water
  • 1/4 c unsalted butter
  • 1 tablespoon light corn syrup
  • 1 3/4 cup milk
  • 1/2 cup white sugar
  • 3 tablespoons cornstarch
  • 3 tablespoons flour
  • 1/4 teaspoon salt
  • 2 egg yolks, slightly beaten
  • 1 baked pie shell (9 ")
  • meringue

Instructions

  1. Bake your pie shell accordingly. It can be store bought or homemade. I prefer homemade and used my Mom's old Betty Crocker cookbook to make mine.
  2. In a nonstick medium saucepan, combine brown sugar, butter, water, and corn syrup. Cook on medium heat stirring constantly for about 10-12 minutes or until a small amount forms a hard ball in cold water. *Tip provided by Mom.
  3. At the same time, scald your milk in the top of a double boiler. I let my water boil first and then added my milk. When it started to steam (about 10 minutes) I added my white sugar, cornstarch, flour, and salt. I made sure I had my dry ingredients premixed before I started my cooking my milk. That way it was easily accessible to pour into the milk.
  4. After you add your dry ingredients to your milk, you want to use a hand mixer to beat your ingredients, making sure to scrape the sides of your double boiler. It should be thick and smooth.
  5. Add the butterscotch mixture and stir until smooth.
  6. Temper your egg yolks with a small amount of your butterscotch mixture.
  7. Add the tempered eggs to your butterscotch and beat with a mixer to combine.
  8. Cool and pour into baked pie shell and add meringue.
  9. Bake at 350 degrees for 10-12 minutes or until your meringue is set.
  10. Let cool to room temperature and then place in refrigerator for 2-3 hours to set.
Schema/Recipe SEO Data Markup by ZipList Recipe Plugin
http://www.bakenoprisoners.com/wordpress/index.php/disney-hogwarts-and-butterscotch-pie/


Brown Butter “Snicker”doodles

Brown Butter "Snicker"doodles

Ohmigosh, you guys. I am beyond excited…

Tomorrow kicks off my birthday week!!!! Yes, week!!!

While I truly believe I am 15 in my head, it will actually be my 5th annual 29th birthday this Friday…

And Mr. BNP and I are headed to Florida…

…to go to…

The Wizarding World of Harry Potter and Epcot…

SQUEEE!!

And! And, since I am a Tampa Bay native, I am also planning to spend time with family and friends…and Winter the dolphin…because. :)

I am completely in love with the Hubster for planning this trip and I promise to take loads of pictures to share with you guys next week.

But for now, let’s talk cookies…

I am obsessed with Snicker doodles. Like, I could eat 5 or 6 cookies, hot, right out of the oven, on any given day, in one sitting…that is how much I love them. At Christmas time, Betty Crocker stocks the shelves of Target with the best Snicker doodle mix I have ever found and so I buy them all up. But by this time in the year, they are hard to find and I have completely run out of my snicker doodle stash.

So last weekend I found myself in desperate need of some snicker doodles. I was going through some definite withdrawal…for serious. I went into the kitchen and instantly started working on my own recipe. I looked like a mad scientist, you guys! Flour in my hair, cinnamon and sugar all over my apron, but in the end, I made these incredible bad boys.

Brown Butter "Snicker"doodles

They are comparatively, just as delicious as Betty Crocker’s in my opinion. And just to add a twist to my cookie, I added a Snickers mini inside the middle. Oh, and I also browned the butter first to give it a nutty flavor. It tied in nicely with the peanuts from the Snickers bar.

Brown Butter "Snicker"doodles

Browning butter is very simple. Slice your butter into tablespoon pieces first, so that your butter melts evenly. Whisk constantly in a medium saucepan on medium high heat for 5-8 minutes. Make sure you take it off the heat once you start to see the light brown specks on the bottom. Transfer it to a different bowl to prevent it from burning.Brown Butter "Snicker"doodles

I cut the Snickers minis in half and then wrapped the dough around the candy bar before dipping it into my cinnamon sugar mixture.

Brown Butter "Snicker"doodles

Make sure you keep your cookies 1-2 inches apart on your cookie sheet. That way they won’t run into each other when they flatten out.

DSC03740_600x400Let your cookies cool for a few minutes before transferring them onto a wire rack to prevent them from breaking.

Brown Butter "Snicker"doodles


Brown Butter “Snicker”doodles

Yield: 2 1/2-3 dozen

Recipe by Carrie

Ingredients

  • 1 cup (2 sticks) browned butter, cooled to room temperature
  • 2 eggs, room temperature
  • 1 1/2 teaspoons vanilla extract
  • 2 3/4 cups flour
  • 1 1/2 cups granulated sugar
  • 2 teaspoons cream of tartar
  • 1 teaspoon baking soda
  • 1/4 teaspoon salt
  • Bag of mini snickers, cut in half
  • 4 tablespoons sugar
  • 1 tablespoon cinnamon

Instructions

  1. Preheat oven to 350° and line cookie sheets with parchment or silapat.
  2. When browning your butter, slice your sticks of butter into tablespoon sized pieces so that it melts evenly.
  3. You want to whisk your butter continuously in a medium sauce pan on medium-high heat for about 5-8 minutes.
  4. Smell your butter, it should have a nutty aroma. You should be able to see small brown specks on the bottom of the pan.
  5. Immediately remove from heat and transfer into separate bowl to cool and to prevent the butter from browning any further.
  6. In your stand mixing bowl, combine butter and sugar until light and fluffy; about 2-3 minutes.
  7. In a separate bowl, combine flour, cream of tartar, baking soda, and salt.
  8. Add eggs to your butter mixture; one at a time until fully incorporated.
  9. Add your vanilla extract.
  10. Slowly add your flour mixture to your wet ingredients; mix until just combined.
  11. In a small bowl, combine your 4 tablespoons sugar and 1 tablespoon of cinnamon.
  12. Using a mini-ice cream scoop, measure out 1 heaping tablespoon of dough and roll into a ball.
  13. Press half of the Snickers min into the middle of your dough and carefully wrap the dough around the candy bar.
  14. Roll back into a ball and into your sugar & cinnamon mixture.
  15. Place cookies 1 1/2 inches apart on your cookie sheet and bake for 10 minutes or until golden brown.
  16. Cool on a wire rack for 10-15 minutes.
Schema/Recipe SEO Data Markup by ZipList Recipe Plugin
http://www.bakenoprisoners.com/wordpress/index.php/brown-butter-snickerdoodles/


Salted Chocolate Toffee = Salted Chocolate Toffee Shortbread Cookies = Salted Chocolate Toffee Milkshake

I am a late-to-life nerd in some ways because I used to get teased in school for all  the geeky things that I enjoyed. So as I got older, at some point or another, I abandoned all my beloved Disney friends, time traveling aliens, spaceships, and fantasy sci-fi to try and fit in. When I finally realized that a.) I would never truly fit in with the “it” crowd and b.) nerds are cool, I let my geek flag fly high and proud.

The fact of the matter is, nerds rule the world…

It’s true. Ask anybody…

Natalie Portman, Ben Stein, Bill Gates, Albert Einstein, and Emma Watson are just a few famous nerds in existence.

…the list goes on and on and for thousands of years.

Wil Wheaton was recently asked by a new mom to explain to her newborn daughter why it is awesome to be a nerd…

His response was the stuff of legend…life changing for not only the newborn and her mom, but to every other nerd in the room…

Check it out..

So in honor all all things geekery, I made toffee. But not just any ordinary toffee though…

I made you Salted Chocolate Toffee…

Which then turned into Salted Chocolate Toffee Shortbread Cookies…

And then Salted Chocolate Toffee Milkshakes…

Oh yeah…I went there…and so should you.

Salted Chocolate Toffee
Let’s start with the toffee. Shall we?

Salted Chocolate Toffee

Combining your sugars, butter, corn syrup, and water, you want to make sure all your sugars dissolve and that it reaches 285 degrees. This is called the soft-crack stage. Soft-crack stage has been reached when the syrup forms firm but is still pliable. It is typically referenced for your toffees, brittles, and even butterscotch.

Salted Chocolate Toffee

After you have poured your toffee onto a rimmed cookie sheet, gently sprinkle your chopped chocolate and let the hot toffee melt it until it is spreadable, then sprinkle your sea salt.

Salted Chocolate ToffeeIf your using your toffee in another recipe like me, wait until it is completely cooled before a coarse chop. Or if it is by itself, just crack it a few times with a knife and dig in.

Salted Chocolate Toffee

Total Time: 30 minutes

Recipe by Carrie

Ingredients

  • 1 cup salted butter, softened
  • 1/2 cup light brown sugar, packed
  • 1/2 cup granulated sugar
  • 1 tablespoon light corn syrup
  • 1 tablespoon water
  • 1 teaspoon vanilla extract
  • 1/4 teaspoon baking soda
  • 6 ounces semisweet chocolate, coarsely chopped
  • coarse sea salt

Instructions

  1. Preheat oven to 350 degrees and spray rimmed baking sheet with flour spray.
  2. In a medium saucepan, combine butter, sugars, corn syrup, and water.
  3. Bring the sugar mixture to a boil, constantly stirring to dissolve the sugars.
  4. Have the baking soda and vanilla extract ready.
  5. Cover the saucepan with a lid for about a minute to allow any of the sugar mixture to melt down into the pan.
  6. Remove lid and securely clamp a candy thermometer to the side of the pan, making sure it does not touch the bottom.
  7. Cook, without stirring, until the sugar mixture reaches 285 degrees(soft crack stage).
  8. Remove saucepan and add the vanilla and baking soda, stirring to combine.
  9. Immediately pour the mixture evenly onto the baking sheet.
  10. Spread the chopped chocolate over the toffee mixture.
  11. After 2-3 minutes, the chocolate will be softened enough to spread an even layer over the toffee using an offset spatula.
  12. Sprinkle 2-3 teaspoons of coarse sea salt or fleur de sel over the melted chocolate.
  13. Place pan in the fridge until chocolate has set.
  14. Using a sharp knife, cut toffee into desired pieces.
Schema/Recipe SEO Data Markup by ZipList Recipe Plugin
http://www.bakenoprisoners.com/wordpress/index.php/salted-chocolate-toffee-salted-chocolate-toffee-shortbread-cookies-salted-chocolate-toffee-milkshake/

Now let’s talk cookies. I found these way cool cookie cutters at World Market. They have a unique, almost rectangular cut out right in the middle so that you can slip one of these bad boys on a tall glass of milk…or even better, milkshake.

Salted Chocolate Toffee

This is the star shape, but they also have hearts and flowers. I couldn’t help but buy all three.

Salted Chocolate Toffee

Salted Chocolate Toffee Shortbread Cookies

Yield: 4 dozen cookies

Recipe by Carrie

Ingredients

  • 4 cups flour
  • 2 cups salted butter, softened
  • 1 cup granulated sugar
  • 2 teaspoons vanilla extract
  • 3/4 cup salted chocolate toffee, coarsely chopped

Instructions

  1. Preheat oven to 350° and line baking pan with parchment or silapat.
  2. In your stand mixer bowl, cream butter and sugar until light and fluffy.
  3. Add vanilla one teaspoon at a time until incorporated.
  4. Add 1 cup of flour at a time and mix well.
  5. Fold in salted chocolate toffee.
  6. Roll into a ball and wrap in saran wrap.
  7. Place in fridge for 30 minutes to an hour.
  8. Flour your surface, roll out a small ball of dough to about a 1/2 inch, and cut using your favorite cookie cutters.
  9. Bake for 9-10 minutes and allow to cool for 5-10 minutes before transferring to a wire rack.
Schema/Recipe SEO Data Markup by ZipList Recipe Plugin
http://www.bakenoprisoners.com/wordpress/index.php/salted-chocolate-toffee-salted-chocolate-toffee-shortbread-cookies-salted-chocolate-toffee-milkshake/

And to tie it all together….Salted Chocolate Toffee Milkshake with our cookies as garnish.

Salted Chocolate ToffeeWe had a few friends over the night that I made these. Not only did we each have our own milkshake and cookies, but we manage to finish them…complete with our spoons scraping the bottom for more.

Salted Chocolate Toffee Milkshakes

Recipe by Carrie

Ingredients

  • 8 scoops of Breyers Homemade Vanilla icecream
  • 3/4 cup salted chocolate toffee, coarsely chopped
  • 1/4 cup whole milk
  • 1 teaspoon vanilla

Instructions

  1. Combine ingredients in blender and blend on high for about a minute.
  2. Add milk or take away depending on your preference of thickness.
  3. Top with a Salted Chocolate Toffee Shortbread Cookie and bits of toffee.
Schema/Recipe SEO Data Markup by ZipList Recipe Plugin
http://www.bakenoprisoners.com/wordpress/index.php/salted-chocolate-toffee-salted-chocolate-toffee-shortbread-cookies-salted-chocolate-toffee-milkshake/

Salted Chocolate Toffee

Semi-homemade Strawberry Push Pops

My Mom lives hundreds of miles away, so each year, when Mother’s Day rolls around, I try to think of something new to show her how much she is loved. Something from the heart that says, thank you for being there. This year, both my Mom and MIL got a handmade, framed family tree that included all the kids, grand-kids, and grand-pups. Mr. BNP and I spent several nights putting it together and making it just right for our Mamas.

My Mom is the type of person who gives you 100% at all times. She is full throttle at everything she does. The way she loves you. The way she supports you. Even the way she hugs you. And she gives the best hugs. We talk everyday and spend every holiday together. We cook together. We shop together. We are each others best friend and we have been that way for many years.

But all of that could have changed about a year ago…

You see, my Mom had a massive heart attack, followed by triple bypass surgery a few months later.

My heart broke when I got the phone call. I was on a plane that night to see her. I had no idea whether my life would fall apart that day or not.

Over the past year, I have seen my Mom give a 100% in her recovery. I have seen strength, perseverance, and a renewed love for life. She finally took the trip of her dreams and spent 31 days in Europe. She met and chatted with the Canadian Tenors, her favorite music group. And she is finally learning that a new life can start at any age and to never give up on your dreams.

My Mom. My hero. I love you more than words could say. I am so proud to call you my Mom.

So here is something that is easy and girly and perfect for any Mom.

Semi-homemade Strawberry Push Pops

These semi-homemade push pops combine the sweet crunch of strawberry Rice Krispie Treats with the creamy flavor of strawberry shortcake icing.

Semi-homemade Strawberry Push Pops

To begin, heat on medium heat, 3 tablespoons of butter in a medium saucepan until melted. Add a 10 oz. bag of vanilla and strawberry marshmallows to melted butter and stir until marshmallows are melted and gooey.  Add 6 cups of Rice Krispies cereal and mix well. Using wax paper, press firmly into a rimmed cookie sheet sprayed with flour spray.

Semi-homemade Strawberry Push Pops

You can find push pop containers at your local craft store, but I found mine on Amazon and it came with a handy stand to hold them. This really helps when you are trying to decorate or layer.

Once the strawberry Rice Krispie treats are cooled, use the circle top end of your push pop to “cut out” your circles.

Semi-homemade Strawberry Push Pops

You will need 2-3 circles per push pop container.

Semi-homemade Strawberry Push Pops

Gently push the Rice Krispie treats down to the bottom of your push pops and then layer with icing.

Semi-homemade Strawberry Push Pops

I chose to use a can of Frosting Creations from Duncan Hines I had in my pantry, along with the Strawberry Shortcake flavoring packet. It went perfectly with the strawberry Rice Krispie treats.

Semi-homemade Strawberry Push Pops