Doctor Who Valentines That Will Melt Even the Doctor’s Two Hearts {Free Printable}

I love the fact that as a teacher, I get to participate in the yearly Valentine’s Day exchange of candy and cards.  At the beginning of February, I take to the local card shops and try to find the best valentine that represents me and my favorite things. Last year it was totally Harry Potter all the way. I thought this year I might do something Hunger Games related, but lately I have been really into catching up on all of the old Doctor Who reruns. So last week I finally decided I wanted to pass out Doctor Who valentines to all the kiddos. When I couldn’t find any, I thought why not make them?!?

Here is my take on how the Doctor, Oods, Daleks, and the TARDIS would celebrate Valentine’s Day…if they could…

DrWho-02

I am so excited on how my TARDIS came out. I only had to draw it once (unlike my Ood) but I think it turned out brilliant!

DrWho-04

Here is my Ood…I changed his second brain into a heart for Valentine’s Day!

DrWho-05

My Valentine Dalek has chosen to say INFATUATE instead of EXTERMINATE!

DrWho-03

I have my bag packed in case the Doctor ever shows up with the TARDIS…

Feel free to save and print, fellow Doctor Who fans! If you plan to share or post online, please take a moment to give credit and attribution to the source of origin. To print, click on the link below and save or print “WhoValentines” on heavy bright white paper. Print at 100%, feel free to scale.


WhoValentines


Oh, and if you’re looking to find out how to write your name (and more) in Gallifreyan, then you MUST check out Sherman’s Planet. He’s created a guide on how to translate anything into the language of the Time Lord. Tricky? Yes….but totally worth it!

I am still working on my name, but I will share it once it is completed!

Warning: Valentine Fabulousity

I have got so much going on for you guys in this post that I might just explode with excitement!!

First off, let me tell you that I am not your average valentine.

I don’t like flowers.

I don’t do expensive jewelry.

I don’t even like to go out to dinner.

Weird? I know. But in our house, we like to make each other something to celebrate Valentine’s Day.

(Supposedly the hubster is secretly working on a glowing Doctor Who sign for me…SQUEEE!! What else could a girl possibly want?!)

So I have made you guys something fabulous to show how much you are loved!

Lovey Mantels

DSC01662_600x400

This year I noticed several blogs out there decorating their mantels for the day of L-O-V-E. Amanda Jane Brown was probably my favorite and she gave me a ton of ideas and inspiration for my own mantle. I plan to fill the red picture frame with a valentine print from the awesome Becky Higgins.

DSC01704_600x400

I adored Amanda’s idea of valentine M&M’s in mason jars and I added a junky striped straw to mine to give them a bit more whimsy.

I also love the mustache epidemic that is spreading across the nation. Anybody else? I especially love my hanging heart in the background with its little black handlebar mustache. I think it ties in nicely with the black feather boa that is draped across the mantle.

DSC01650_600x400

I used my apothecary jar to hold the leftover pink and white marshmallows I had after I topped my triple chocolate brownies with them.

For the wreath, I cut a heart out of Styrofoam and hot glued artificial carnations in various shades of red, pink, purple, and white. I also secured some pretty ribbon in the back, so I could hang it up.

DSC01653_600x400

This heart banner was so quick and simple to put together. I found the hearts, twine, and mini-clothes pins at my local craft store. For the background, I just ripped out pages from an old book, trimmed them up, and round the corners. Then I just glued the hearts in the center of the book page and hung them up.

Chocolate Covered Peep Hearts

DSC01508_600x400

You heard me right….I found heart shaped, vanilla Peeps, dipped them in milk chocolate, and sprinkled them with love.

From me. Just for you.

DSC01503_600x400

Don’t you LOVE my new Mickey coffee mug?!?!?! Ahhhhh… I die.

Triple Chocolate Marshmallow Brownies

DSC01475_600x400

Chocolate is the only tradition I keep when it comes to Valentine’s Day…and these brownies are diabolical…choco-magical if you will…and I am totally quoting someone who recently ate these when I say this.

Triple Chocolate Marshmallow Brownies

Recipe by Carrie

Ingredients

  • 3 ounces semisweet chocolate
  • 2 ounces bittersweet chocolate
  • 2 ounces unsweetened chocolate
  • 3 tablespoons cocoa powder
  • 1 stick butter, softened, cut into quarters
  • 3 large eggs, room temperature
  • 1 1/4 cups sugar
  • 2 teaspoons vanilla extract
  • 1/2 teaspoon salt
  • 1 cup all purpose flour

Instructions

  1. 1. Preheat oven to 350 degrees. Spray an 8 in. pan with nonstick cooking spray and line with 2 sheets parchment paper perpendicular to one another. Push paper down into the corners, but allow it to hang over the sides.
  2. 2. In a double boiler, melt all chocolates and butter until smooth. Whisk in the cocoa until blended. Set aside to cool.
  3. 3. Combine the eggs, sugar, vanilla, and salt in your free standing mixer for 30 seconds. Add the chocolate mixture into the egg mixture until incorporated.
  4. 4. Add the flour in two batches until just blended.
  5. 5. Pour the mixture into the prepare pan and spread evenly into the corners.
  6. 6. Bake until slightly puffed and when a toothpick inserted comes out with a few sticky crumbs, about 35-40 minutes.
  7. 7. If adding marshmallows, take out at 30 minutes, add marshmallows, and bake for an additional 5 minutes or until marshmallows have puffed up.
Schema/Recipe SEO Data Markup by ZipList Recipe Plugin
http://www.bakenoprisoners.com/wordpress/index.php/warning-valentine-fabulousity/

DSC01496_600x400

As a teacher, it is my academic duty to be totally up to date on all the latest toys, dolls, and video games(at least, that is what I tell myself when I am perusing the toy department)…..soooo my mini lalaloopsy doll just had to make an appearance on the blog.

Underwater Basket Weaving

It seems like it has been a lifetime since I have lived in Florida, but in reality, it has been a short 7 years. I don’t necessary miss living in Florida. I really only miss my family and Disney, but I am spending the weekend down here because my Mom had a procedure done and I wanted to be here for her during her recovery. It is an hour long drive from her home to the hospital, and as I drive each day, I get to pass by my entire childhood….

The Clearwater beaches where I spent many a day after school soaking up the Florida sun (it is also where Winter the dolphin is located and the famous Frenchy’s, with the best grouper sandwich…EVER. Period.)

My High School, one of the many places where I discovered my love for writing, as well as the realization at how geeky I really was….er…am.

My first home with the Hubster, a cozy little condo overlooking the water with all the comforts of civilization at our fingertips…not a cow in sight…

Posted signs for the Florida State Fair…oh, how I miss you fried everything…

And of course, Florida drivers….I can say that, because I am one of them. But when you gather them all in one place and then mandate the speed limit to 35mph, I go crazy…bat crap crazy….

I could go on….but I would rather show you what I have been working on this week…

   DSC01460_600x400

I have been taking a class to hone in on those decorating skills that I seem to be lacking in the cake department.

This is my final project.

DSC01455_600x400

I made the button flowers out of neon fondant and gum paste.

All you do is combine a little larger than a golf ball size of gum paste with a quarter size ball of neon fondant until well blended. Dust your flower press with a combinations of cornstarch and confectioner’s sugar, roll out your fondant according to the directions, and press down. Hard. Really hard. You also have to use a little tool that sort of looks like a plastic pencil to slowly score the underside to get it out of the press, but it is fairly easy.

Frosting the basket weave took a little more time to master. Thus, the title of this post…Underwater Basket Weaving.

DSC01466_600x400

If you are part of my generation or earlier, you know what I am taking about. This idiom typically refers to a college elective one might take to improve their GPA. It is suppose to reference an easy course or one that would take little effort. That is not the case when it comes to basket weave frosting….although, once I got the hang of it, it went pretty quickly.

Pretty and tasty? Now that is a cake I can live with….

*Recipe Info: Easy Breezy Chocolate Cake

*Buttercream Icing


Happy 2nd Birthday, Bake No Prisoners!

DSC01387_600x400

This week marks the 2nd blogiversary of Bake No Prisoners!

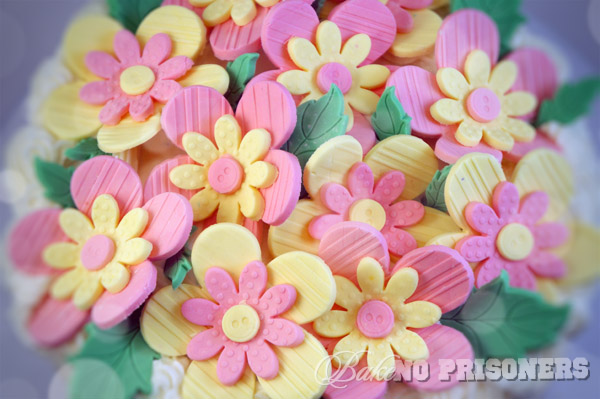
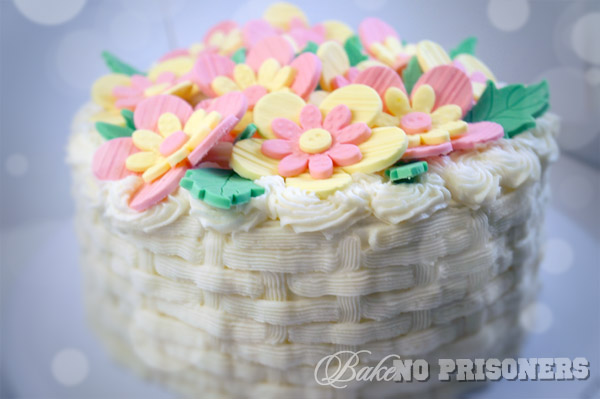
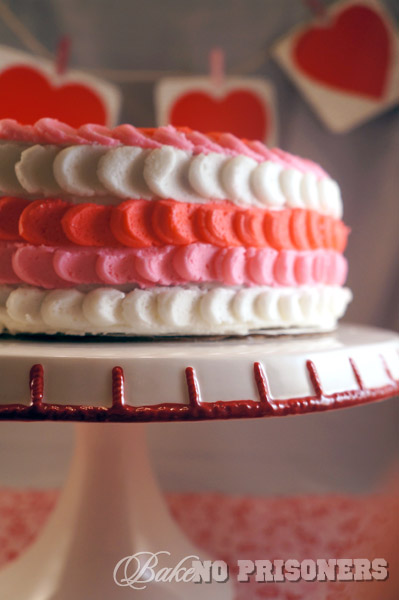
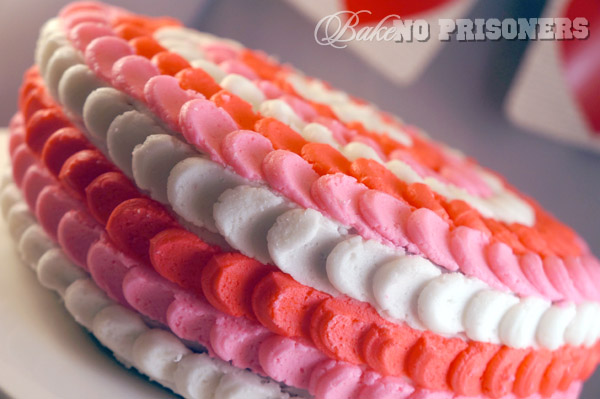
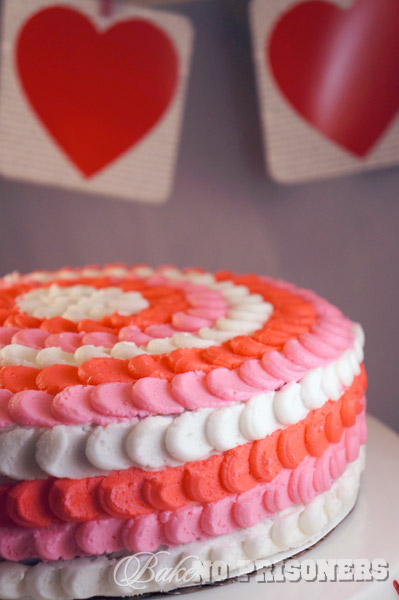
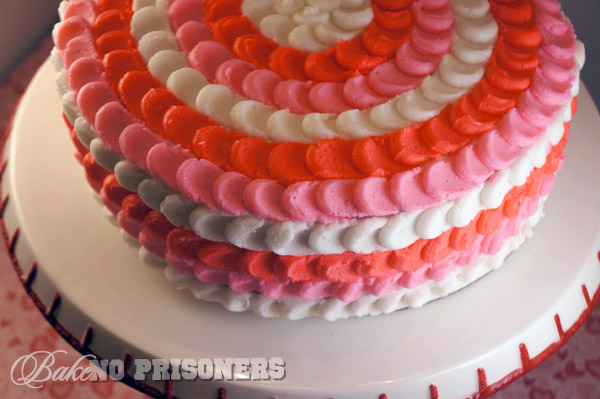
And what better way to celebrate than with this beautiful Valentine Petal Cake and our new look!

To be honest, when Bake No Prisoners started, I really didn’t know what I was in for. At the time, I enjoyed cooking and baking for family and I loved to spend hours surfing the net for inspiring blogs and recipes. I had no real photography skills, nor did I know the first thing when it came to blogging. I just knew that I loved to bake and write…and so once I hit publish on that first post, life as I knew it was over.

Ok…I am being a bit dramatic, but if you look at the big picture from my end, you can see how much I have grown as a baker, a blogger, a photographer, and foodie friend.

I never really started baking until I got married. I come from a long line of amazing women who are self taught bakers and chefs, but I never took the time to hone in on their skills until my early 20′s. My grandmother was known for her apple pies and perfect, flaky crust, for which my Mom says I have surpassed her skills. My Mom is required, not asked, to make several different types of Christmas cookies each year to satisfy the lot of us and it usually takes her weeks to complete this daunting task. And yes, Mom, we are all eternally grateful. And then there’s me. I had a lot of catching up to do and this blog helps me reach my never ending goals.

DSC01403_600x400

As a child, instead of baking, I loved to write. I wrote all the time. Short stories. Poems. Fictional alien narratives that won me awards. I envisioned myself as an author or a journalist of some kind. But as time went on, my passion to write succumbed to my passion for teaching. I have this keen ability to relate to children. Maybe it is because I am still a child at heart, but I like the shows they like (hence my current obsession with Dance Academy), I like the same music, and I am quite the fan of video games. I also have a deep love affair with learning. And I love to pass on that need to learn to my students. This blog allows me to do both….write and learn. I learn new things with every post about Word Press or blogging techniques. I have also learned that posts are not just about the recipes…You have to give a little of yourself to your posts, and readers alike.

DSC01394_600x400

Last year for my birthday, we all went out to the best restaurant in town. It was great. I ordered the duck. My husband brought the annual cookie cake…double stuffed. The whole family was there. My favorite part? My in-laws had purchased me a photo box for my food photography. This changed my photos indefinitely. This meant that they took my blog seriously. Even more…the following month, the hubster bought me my own Sony NEX-5N. Over the past year, I have grown as a photographer. I now know the lighting needed for a certain photo or what background would enhance the picture. I still have a lot to learn, but I am getting better each day. Now if I could only master Photoshop….UGH!

DSC01389_600x400

This last part of my post is most important.

Friends.

Throughout this process I have had so much support from my old friends, positive feedback from my new friends, and am encouraged and excited about the friends to come. I cannot tell you how happy it makes me when someone likes my Facebook page, or follows me on Twitter. And I get super duper pumped up when you leave a comment. It can be pretty scary when you put your ideas, thoughts, and feelings out there for everyone to see, but you make me feel inspired to do it. Thank you to all my friends, old and new, and friends yet to come.

Happy 2nd Blogiversary, Bake No Prisoners! Now have a slice of the bloody cake!

DSC01419_600x400

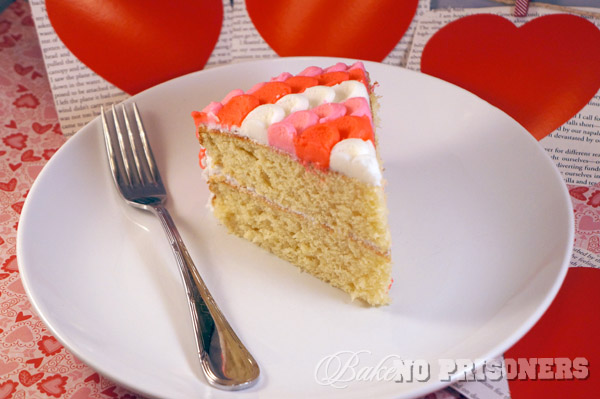
Recipe info: Basic Vanilla Cake

*I substituted half the vanilla extract for almond extract

Amazing tutorial on the Petal cake decorating technique can be found here: The Hungry Housewife

Red Velvet Espresso Brownies

Whenever the forecast calls for a little bit of snow in the Piedmont region of North Carolina everything stops…

People race to the grocery store to stand in a ridiculously long line for milk and bread. The gas stations are lined with cars waiting to fill up their tanks. The local schools call for a snow day. And all the busyness just stops until the snow melts away.

That is exactly what happened today. I had hoped and prayed the night before for a snow day. Not because I didn’t want to go to school and teach, but because it had been about 2 years since the last snow day. And I love my snow days. I have this tradition when it comes to snow days. First, I sleep in. I mean really sleep in… Let the sun wake you up and not feel guilty about it sleep in. Second, I stay in my pajamas all day. I mean why wouldn’t you. There is no where to go…not with my mountain of a driveway anyway. Third, I bake. I try to bake something chocolatey, warm, and gooey that would be perfect for a snowy day. And I think I these brownies are perfect.

Red Velvet Espresso Brownies

Ingredients

  • 5 ounces semisweet chocolate, chopped
  • 2 ounces unsweetened chocolate, chopped
  • 1 stick unsalted butter, cut into quarters
  • 3 tablespoons cocoa powder
  • 1 tablespoon espresso powder
  • 1 1/2 tablespoons red food coloring
  • 1 tablespoon vinegar
  • 3 large eggs
  • 1 1/4 cup sugar
  • 2 teaspoons vanilla extract
  • 1/2 teaspoon salt
  • 1 cup flour

Instructions

  1. Preheat your oven to 350 degrees and adjust your oven rack to the middle position. Spray an 8-inch glass or metal square pan with nonstick cooking spray. Line pan with foil or parchment paper.
  2. In a double boiler, melt the semisweet and unsweetened chocolates and butter, stirring occasionally until smooth. Set aside to cool.
  3. In a small bowl, combine cocoa powder, red food coloring, and vinegar until it makes a thick paste.
  4. In your stand mixing bowl, whisk together the eggs, sugar, vanilla, and salt until combined. Whisk the warm chocolate mixture into the egg mixture, then add the cocoa paste. Once blended, add in the flour a little at a time until just combined.
  5. Pour mixture into the prepared pan, spread into the corners, and level with a spatula. Bake for 35-40 minutes until an inserted toothpick comes out with a small amount of sticky crumbs. Cool on a wire rack or eat warm on a snowy day.

Notes

Recipe by Carrie, inspired by No. 2 Pencil's recipe found on TatertotsandJello

Schema/Recipe SEO Data Markup by ZipList Recipe Plugin
http://www.bakenoprisoners.com/wordpress/index.php/red-velvet-espresso-brownies/


Chicken Tortilla Chili

Ever since I made chicken soup with my Mom over the winter break, I have been wanting to come up with something a bit more exotic in the terms of soup. I am not overly excited about soup in general, but I thought if I could create a soup that I would enjoy, then other people who put soup low on their favorite foods list, might like it as well. I love my Mom’s chicken soup because I grew up having it for dinner and it reminds me of all the fond memories we had as a family sitting around the kitchen table. I am also in love with her homemade biscuits and honey she makes to go along with it. I can eat an entire bowl of her chicken soup, along with 3-4 biscuits and honey any day of the week.

No lie…I can…

Don’t dare me….because I will do it.

So I thought about the soups I don’t mind very often. Two came to mind. Chili…which isn’t necessary a soup, but whatever. It totally counts in my book because it is not only served in a bowl, but is also eaten with a spoon.  And Chicken Tortilla soup with all its crunchy and spicy goodness. And what if I combined the best parts of these two soups. You’ve got the beans, cheese, and onions from the chili. And the chicken, green chilies, and tortilla strips from the Chicken Tortilla soup. Combined is absolute yummy deliciousness – to quote one of my students.

Chicken Tortilla Chili

Recipe by Carrie

Ingredients

  • 3 boneless chicken breasts
  • 3/4 cup chicken broth
  • 3 garlic gloves, minced
  • 1 yellow onion diced, or in my case 1/2 teaspoon asafetida due to the hubster's onion allergy
  • 1 teaspoon cumin
  • 1 teaspoon Tabasco Green Pepper sauce
  • a few sprigs of cilantro
  • 2 15 ounce cans diced tomatoes, juice included
  • 2 cans of white beans - great northern/cannellini
  • 1 4 ounce jar chopped green chilies
  • 1 cup frozen corn
  • 1/2 cup shredded Mexican cheese blend
  • 1 avocado, sliced
  • 1/2 lime, squeezed
  • tortilla strips

Instructions

  1. In your blender, empty your cans of diced tomatoes and all the juice, garlic, onion or asafetida, cumin, cilantro Tabasco, and chicken broth. Blend until all ingredients are incorporated into a thick sauce.
  2. Salt and pepper you chicken breasts and then place in your crock pot. Pour your sauce over the chicken and cook on high for 3 hours.
  3. When chicken is tender, shred with a fork.
  4. Drain the white beans and add to your crock pot, along with the green chilies and frozen corn. Squeeze half a lime as well into your pot and let it continue to simmer for another 30 minutes.
  5. After 30 minutes, spoon chili into your bowl and top with cheese, tortilla strips, and avocado. Enjoy!
Schema/Recipe SEO Data Markup by ZipList Recipe Plugin
http://www.bakenoprisoners.com/wordpress/index.php/chicken-tortilla-chili/
 

DSC01313_600x400

Gingerbread Waffles

I am dreading the day Starbucks revokes their seasonal Gingerbread latte.

DREADING IT!

I am absolutely in love with that steaming cup of gingerbread-y goodness. And after several trips to Starbucks this winter season, I finally have it down to a science – grande, non-fat, 1/2 syrup pumps (which is exactly 2 1/2 preferred), no whip, hot.

As nervous as I am about Starbucks pulling my gingerbread coffee salvation, I think I may have come up with a healthy breakfast substitution.

Whole Wheat Gingerbread Waffles.

Warm, fluffy, and HEALTHY Gingerbread Waffles. This is genius, people. Now I can get my gingerbread fix without the guilt, anytime I want. And for those of you who made the New Year’s resolution to lose a few pounds, this recipe is the perfect Saturday morning treat…next to Saturday morning cartoons, of course.

Gingerbread Waffles

Recipe by Carrie

Ingredients

  • Whole Wheat Gingerbread Waffles
  • Ingredients:
  • 2 cups whole wheat flour
  • 1/2 cup Splenda brown sugar blend
  • 1 teaspoon baking powder
  • 1 teaspoon baking soda
  • 1 tablespoon Spiced Vanilla Bean sugar
  • 1 1/2 teaspoons cinnamon
  • 1/2 teaspoon Baking Spice
  • 1/4 teaspoon cloves
  • 1/4 teaspoon ginger
  • 2 eggs
  • 4 egg whites
  • 6 tablespoons butter or margarine, melted and cooled
  • 1 cup skim milk
  • 1/2 cup low fat sour cream
  • 3 tablespoons molasses

Instructions

  1. In your standing mixer bowl, combine flour, sugar, baking powder, baking soda, and spices.
  2. In a medium bowl, combine eggs, egg whites, cooled butter, milk, sour cream, and molasses. Whisk until blended.
  3. Add the wet ingredients to the the dry ingredients in the standing mixer bowl and whisk to combine until all the dry ingredients are incorporated.
  4. Preheat your waffle iron. Fill waffle wells and cook according to the manufacturer’s instructions. Cook until crisp and golden brown. Serve immediately.
Schema/Recipe SEO Data Markup by ZipList Recipe Plugin
http://www.bakenoprisoners.com/wordpress/index.php/gingerbread-waffles/


DSC01255_600x400


A Homemade Christmas

Busy. That is the word I have been using lately as to why I haven’t been posting as much.  It’s not that I don’t love my very small group of amazing followers(mostly family…thanks Mom), but the holidays are here in full swing at my house.  And on top of my already lovely and fabulous full time job, I have been in the process of hosting Thanksgiving, Christmas parties, and cookie exchanges for the last several weeks.

Oh..and I also make my own Christmas cards.

This is a tradition that a few of us ladies started last year. My creative friend Laurin, has us all over at her house (this year with a brand new babes in tow), whips up a few appetizers, opens a bottle of wine, and for the next several hours, shows us amateurs how to slice, dice, stamp, and bow tie our very own Christmas cards.

This is the before view of our craft table.

30 minutes in and my first card is complete…14 more to go…

The infamous and ever so lovely Laurin.

After you get about halfway through the cards, you begin to get a bit delirious(or tipsy) and start sticking the jewels to your forehead instead of the card, thinking that it might just be easier to mail yourself. I kid.

Stamping is messy. I was washing that stuff off for days. I don’t kid.

If you are one of the lucky 15 to receive one of these cards, then you now know how much hard work and love(and a few tears..) went into them…don’t throw them away! Merry Christmas and Happy Holidays!

The Last of the Pumpkins….

These cinnamon pumpkin muffins will mark the last post of the fall season. Just writing this post is giving me pumpkin withdrawals….

No, seriously. That is how big my love for pumpkins is. Think love for pumpkins multiplied by infinite to the furthest degree. My love runs deeper than that.

I came up with this muffin recipe last week after I had made the obvious, yet traditional pumpkin pie for Thanksgiving Day. I had half a can of pumpkin left and zero room in the fridge to put it thanks to the 15 lb. turkey that was thawing on the 2nd shelf. I also had several house guests who drove up from Florida that were in desperate need of some good home cooking. Let’s just say the Outback in their area knows them by name…first name.

This cutie pie was one of 4 house guests that came up for turkey day. He is my adorable nephew and I caught him setting the table for Thanksgiving dinner!

So I took the half can of pumpkin, 3/4 cup brown sugar, 1 stick of melted butter, 2 eggs, and 2 heaping spoonfuls of sour cream and whisked it all together.

Then I mixed 2 cups of flour, 1 teaspoon baking powder, 1/2 teaspoon salt, 1/4 teaspoon baking soda, and 1 tablespoon of baking spice. Savory Spice Shop has baking spice that is perfect for almost anything!

Finally I folded in the wet mixture with the dry ingredients, divided the batter among 12 standard muffin cups, and topped each one with toasted pumpkin seeds and Pampered Chef’s sweet cinnamon sprinkle.

Bake at 350 degrees for 20 to 25 minutes or until a toothpick comes out clean.


Election Day Push Pops

Commit to Mitt was the theme this weekend as the hubster and 20 other Romney supporters traveled to swing state Ohio. They went door to door and visited hundreds of homes to encourage people young and old to get out there and vote on Election Day tomorrow. To say the least, I am one proud wifey! So to celebrate his hard work and Election Day tomorrow, I made these awesome red, white, and blue cake Push Pops.

They were really simple to put together. First,  I made 2 8 in. rounds of my vanilla spice cake; one red, one blue. Once they were cooled, I used the circle top of the push pop to cut out the red and blue layers. I added the red layer first, then some leftover icing I had in the fridge, the blue layer, and then piped a fat layer of frosting on top. I also added some red, white, and blue sprinkles for fun!

No matter what your party don’t forget to get out there and vote tomorrow on Election Day! Make your voice heard!!

Vote early and vote often. -Al Capone