Underwater Basket Weaving

It seems like it has been a lifetime since I have lived in Florida, but in reality, it has been a short 7 years. I don’t necessary miss living in Florida. I really only miss my family and Disney, but I am spending the weekend down here because my Mom had a procedure done and I wanted to be here for her during her recovery. It is an hour long drive from her home to the hospital, and as I drive each day, I get to pass by my entire childhood….

The Clearwater beaches where I spent many a day after school soaking up the Florida sun (it is also where Winter the dolphin is located and the famous Frenchy’s, with the best grouper sandwich…EVER. Period.)

My High School, one of the many places where I discovered my love for writing, as well as the realization at how geeky I really was….er…am.

My first home with the Hubster, a cozy little condo overlooking the water with all the comforts of civilization at our fingertips…not a cow in sight…

Posted signs for the Florida State Fair…oh, how I miss you fried everything…

And of course, Florida drivers….I can say that, because I am one of them. But when you gather them all in one place and then mandate the speed limit to 35mph, I go crazy…bat crap crazy….

I could go on….but I would rather show you what I have been working on this week…

   DSC01460_600x400

I have been taking a class to hone in on those decorating skills that I seem to be lacking in the cake department.

This is my final project.

DSC01455_600x400

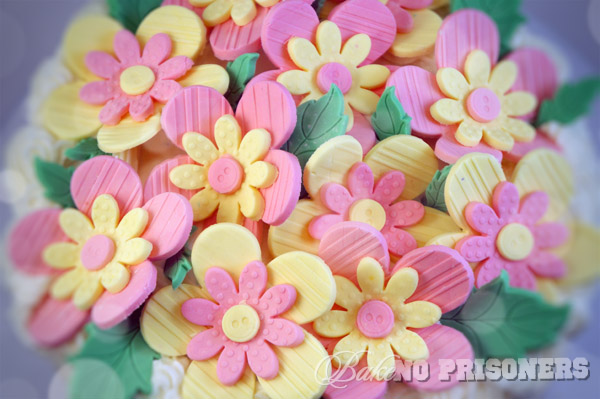
I made the button flowers out of neon fondant and gum paste.

All you do is combine a little larger than a golf ball size of gum paste with a quarter size ball of neon fondant until well blended. Dust your flower press with a combinations of cornstarch and confectioner’s sugar, roll out your fondant according to the directions, and press down. Hard. Really hard. You also have to use a little tool that sort of looks like a plastic pencil to slowly score the underside to get it out of the press, but it is fairly easy.

Frosting the basket weave took a little more time to master. Thus, the title of this post…Underwater Basket Weaving.

DSC01466_600x400

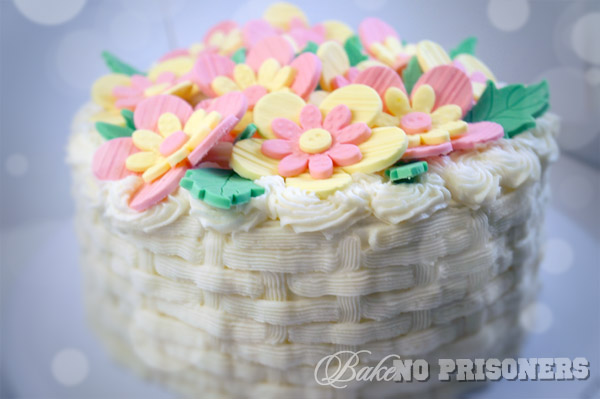
If you are part of my generation or earlier, you know what I am taking about. This idiom typically refers to a college elective one might take to improve their GPA. It is suppose to reference an easy course or one that would take little effort. That is not the case when it comes to basket weave frosting….although, once I got the hang of it, it went pretty quickly.

Pretty and tasty? Now that is a cake I can live with….

*Recipe Info: Easy Breezy Chocolate Cake

*Buttercream Icing


Election Day Push Pops

Commit to Mitt was the theme this weekend as the hubster and 20 other Romney supporters traveled to swing state Ohio. They went door to door and visited hundreds of homes to encourage people young and old to get out there and vote on Election Day tomorrow. To say the least, I am one proud wifey! So to celebrate his hard work and Election Day tomorrow, I made these awesome red, white, and blue cake Push Pops.

They were really simple to put together. First,  I made 2 8 in. rounds of my vanilla spice cake; one red, one blue. Once they were cooled, I used the circle top of the push pop to cut out the red and blue layers. I added the red layer first, then some leftover icing I had in the fridge, the blue layer, and then piped a fat layer of frosting on top. I also added some red, white, and blue sprinkles for fun!

No matter what your party don’t forget to get out there and vote tomorrow on Election Day! Make your voice heard!!

Vote early and vote often. -Al Capone

Spicy Peach Milkshakes and a MILKSHAKE BAR cookbook giveaway

We have a winner to announce for Bake No Prisoners Milkshake Bar GIVEAWAY! Our winner will receive a copy of the Milkshake Bar, by Hannah Miles!

The winner is……comment #5!!!!!

Samantha Remington says:

August 30, 2012 at 6:19 pm (UTC -5)

Vegan chocolate

Congratulations, Samantha!! I will contact you shortly for shipping information.

School is back in session this week and we are celebrating the end of summer and the beginning of the new school year with one of my favorite things…MILKSHAKES!! And to top it off, BNP is giving away Hannah Miles’ MILKSHAKE BAR cookbook! It is filled with everything from Lemon Meringue milkshakes, to Watermelon Coolers, to even a doughnut float! You won’t want to miss out on this!!

When I was little, I always loved the end of summer. Mom and I would head to the mall to pick out new clothes, kicks, and school supplies for the upcoming school year. (Some things never change! I am totally in love with my new purple glitter Vans I got a few weeks ago! Thanks Mom!) Summer was also our last chance to have our friends over for a sleepover or go to the pool. And nothing made a hot Florida summer day better than a cold sweet treat.

Today, I am still picking out new clothes and heading to the pool at the end of summer vacation, but it is the cold summer treats that really make my day! I had recently picked up a few pounds of peaches and was inspired (thanks to my new Milkshake Bar cookbook) to make this spicy peach milkshake.

I began by taking 4 peaches, peeled and diced, and placed them in a small 4 quart pot. I then added a 1/4 cup of sugar, 1 tablespoon of cinnamon, a dash of nutmeg and 3 tablespoons of water. With the burner on low, I let the peach mixture simmer for 30 minutes. Finally, I let it cool to room temperature.

The ice cream base comes from my father-in-law’s top secret, super-easy, lightning fast, vanilla ice cream recipe. Unfortunately, this is all I can show you about the recipe without being in jeopardy of a major copyright infringement lawsuit…Ha!

Honestly, you can use any vanilla ice cream base recipe you want and whip it up in your ice cream maker in less than 30 minutes!

Once at desired consistency, add 4-6 scoops of vanilla ice cream to the blender, along with your cooled peach mixture, a little milk,  and blend. I saved a few spoonfuls of the peach mixture to place on top for decoration.

Now onto the giveaway…

How to Enter the Milkshake Bar Cookbook GIVEAWAY

To enter this giveaway, just answer the following question in the comments section of this post:

“What’s your favorite milkshake?”

Additional (Optional) Entries

To up your chances of winning, you can receive up to THREE additional entries to win by doing the following (these are optional, not required):

1. Become a fan of Bake No Prisoners  on Facebook. Come back and let me know you became a fan in an additional comment.

2. Share Bake No Prisoners on Facebook on your personal page and let me know you did in an additional comment.

3. Follow @BakeNoPrisoners on Twitter. Come back and let me know you’ve followed in an additional comment.

The Fine Print

Restrictions: Winner must have a U.S. shipping address.

Deadline: Friday, August 31, 2012 at 11:59pm EST. Contest is now closed.

Winner: The winner will be chosen at random using Random.org and announced at the top of this post. The winner will also be notified via email; if the winner does not respond within 48 hours, another winner will be selected.

GOOD LUCK!!

Duh, Pinning…

This girl loves her jewelry! At any given moment, I could be in the car on my way to The Jewel Box to pick out something that sparkles and glitters in the sunlight. I love everything from  big chunky rings to long dangle earrings. Nothing is truly off limits when it comes to accessorizing.  I have so much jewelry in fact, that I have not one, not two, but 3 jewelry boxes and 2 drawers FULL of bling!

I am a jewelry junkie.

I think I have a problem….

I may have to be admitted or attend weekly JA (jewelry anonymous) meetings. :D

So while on Pinterest the other day, I noticed this jewelry wall DIY that caught my eye from Something Like That Designs. It seemed simple. It seemed cheap. (Two of my favorite things.) And it offered a solution to my ever mounting jewelry addiction. It also allowed me to view my jewelry collection at a glance, so that I didn’t forget altogether about something I had purchased awhile back and that I didn’t have to go digging around for a certain piece in one of my many jewelry locations.

The total cost was around $20, but it has given me a bit of solace and a way to view all of my favorite pieces so that I can choose what works best with what outfit.

What you will need:

3 dowels (You can find these at Lowes or Home Depot)  I purchased the 0.97 cent ones.

white spray paint

small white screw-in-to-the-wall hooks

pretty ribbon

hot glue or Elmer’s glue

chicken wire (Again at Lowes. I purchased the smallest roll possible at $8.97)

2 photo frames – any size you want, as these are for your earrings (I found 2 silver 8 by 11 frames on clearance at Micheal’s)

What to do:

This is the really easy part. All you have to do is clamp the dowel to a secure location and cut to preferred length using a Dremel. Then spray paint them white, or any other color you like. I choose white because I had this awesome neon ribbon I could glue around the painted dowel. This made the neon ribbon really pop against the white paint. Glue the ribbon around the dowels. Finally, screw the hooks into the wall and place the dowels on the hooks. Voila! A new and funky way to display your favorite pieces!

For the frames, I just took out the glass and matting and replaced it with chicken wire. This part was a bit more difficult because it wouldn’t fit exactly right. I may go back and cut new wire and staple it to the frame, but for now it holds my earrings nicely. (Don’t you just love my Harry Potter calendar next to the frame! squee!)

Lastly, for all of you kiddos (and teachers) headed back to school tomorrow, GOOD LUCK and have a wonderful year! I know I will! I will have a peachy milkshake and cookbook giveaway to kick off the new school year in a few days, so be on the lookout!

If you like Piña Coladas…

Yes, I just pulled a cheesy song intro, but…come on….you know you are singing the rest of that song in your head! (I know I am…Ha!)

I can still feel the sand between my toes…the sun shining on my face…. the waves crashing on the beach…

But alas, my beach vacation is over…back to my everyday small town life. It’s not so bad really(in fact, I LOVE where I live now), but growing up near the beach my whole life, I took advantage of its close proximity. There were many days where I would hop in my car after school and drive down to the beach to hang out with my friends. When it takes you more than 4 hours to get to the nearest beach it makes you appreciate it so much more. It makes you want to stay forever!

These are just a few pictures from our annual family trip to Myrtle Beach, SC.

Our favorite places to eat included Pier 14 and Peaches! At Peaches, I recommend the foot long that has chili, cheese, and fritos…YES FRITOS!!

We walked out onto the Pier after dinner and hammed it up in front of the camera!

My in-laws (middle left) are a few of my favorite people. I am so very blessed to have them in my life.

We got to ride the enormous Sky Wheel on the boardwalk. The view was spectacular! The red arrow is pointing to where my in-laws were sitting while we were up in the air! Now that is a long way down!

Now on to the cupcakes….

While on vacation, my MIL and I enjoyed our own Piña Coladas, but when you can’t get your hands on your own tropical drink, these cupcakes will do the trick for an everyday fix!

Piña Colada Cupcakes

Yield: 12 cupcakes

Prep Time: 25 minutes | Bake Time: 25 minutes

For the Cupcakes:
1½ cups all-purpose flour
1½ teaspoons baking powder
¼ teaspoon salt
½ cup unsalted butter, at room temperature
1 cup granulated sugar
2 eggs, at room temperature
2/3 cup crushed pineapple
¼ teaspoon vanilla extract
½ cup buttermilk

You can add 1-2 tablespoons of rum to the cupcake batter for flavor

To Brush the Cupcakes:
1 to 2 tablespoons white rum

For the Pineapple Coconut Frosting:
1 cup unsalted butter, at room temperature
2¾-3 cups powdered sugar
3-4 tablespoons pineapple juice/rum (if you want that extra kick!)
3 tablespoons Coconut pudding

1. Preheat the oven to 325 degrees F. Line a standard muffin tin with paper liners; set aside.

2. In a medium bowl, whisk together the flour, baking powder and salt; set aside.

3. In an electric mixer on medium-high speed, beat the butter and sugar together until pale, light, and fluffy (about 5 minutes).

4. Reduce the mixer speed to medium and add the eggs one at at time, mixing thoroughly after each addition.

5. Scrape the sides of the bowl and add the  vanilla extract and rum. Mix until combined.

6. Reduce the mixer speed low. Add the dry ingredients in three batches, alternating with the buttermilk in two batches. Mix only until just incorporated, using a rubber spatula to give it one last mix by hand. Fold in the crushed pineapple.

7. Divide the batter between the muffin cups. Bake for approximately 25 minutes or until just slightly golden and a skewer shows only moist crumbs attached, rotating the pan at the halfway point.

8. Allow cupcakes to cool for 5 to 10 minutes, and then remove to a cooling rack. Brush the tops of the cupcakes with the 1 to 2 tablespoons of rum. Set the cupcakes aside to cool completely before frosting them.

9. To make the frosting, whip the butter on medium-high speed of an electric mixer using the whisk attachment for 5 minutes. Reduce the speed to medium-low, and gradually add the powdered sugar, mixing and scraping the sides of the bowl until all is incorporated. Give it a mix on medium speed for about 30 seconds. Add the pineapple juice, rum and coconut pudding and  mix on medium-high speed until incorporated and fluffy. If the frosting appears a bit too soft, add some additional sugar, one spoonful at a time until desired consistency is reached. Frost cupcakes and garnish, if desired, with a wedge of pineapple, a cherry and an umbrella .

If you would prefer to not use liquor in these cupcakes, you can absolutely omit it from both the cupcakes and the frosting with no problem. If you do omit it, I would add 1 tablespoon of vanilla extract to the frosting.

(Recipe adapted from Confections of a Foodie Bride)

Blackberry Pie with Homemade Vanilla Ice Cream

This pie is just in time for Independence Day! When I think of the Fourth of July, I not only think of freedom and those who have fought and defended my right for freedom or how awesome it is to live in southern, down home, “bless your heart” America, but I also think of classic American food. You know exactly what I am talking about. I absolutely love to grill out with some burgers and coleslaw, potato salad, and baked beans. I also have to have fresh from the farm watermelon, strawberries, and of course, blackberries. And it is an must in our home to have classic American desserts like my Mama used to make.

My pastry crust recipe goes back a long way and can be a bit tricky, but my pie filling  is as simple as…well…pie! I had purchased a couple pints of blackberries, raspberries, and blueberries a few days ago at the market. They were too perfect to pass up and I knew I would find a use for them somehow. I ended up using the blueberries for a layered blueberry almond cake and I snacked on some of the raspberries with a bit of honey one of my students had given me (his Mom is an actual bee keeper and super awesome!). And so I decided to make this pie using the blackberries and remaining raspberries I had. And what pairs perfectly with warm, tart blackberry pie? Homemade vanilla ice cream, of course! This vanilla ice cream recipe comes from The Perfect Scoop by David Lebovitz. Lebovitz is a pastry chef  living the perfect life baking his way through Paris. He has his own website, www.davidlebovitz.com, in addition to, several amazing cookbooks. His traditional vanilla ice cream recipe takes a bit of time, but is oh so worth it. We made 2 quarts of this creamy, rich custard like ice cream and it was gone in days. Tie it with this patriotic pie and you have the perfect all American treat!

From all of us at Bake No Prisoners, we hope you and yours have an amazing Fourth of July! God Bless America!

Blackberry Pie

Ingredients:

  • 2 store bought/homemade 9 in. pie crusts
  • All-purpose flour, for surface
  • 7 1/2 cups mixed blackberries and raspberries
  • 1 cup plus 2 tablespoons sugar
  • 1/4 cup cornstarch
  • 1/4 cup fresh lemon juice (from 2 lemons)
  • Lemon zest from 1 lemon
  • Salt
  • 2 large egg yolks
  • 2 tablespoons heavy cream
  • Sanding sugar, for sprinkling

Directions:

1. Roll out 1 pie crust  to about 1/8-inch thickness on a lightly floured surface. Place carefully in a 9 in. pie plate. Trim excess dough and flush with edges of pie plates using a knife, or crimp edges.

2. Stir together berries, sugar, cornstarch, lemon juice, zest and a pinch of salt. Fill pie shell with berry filling.

3. Whisk together yolks and cream. Roll out remaining pie crust to about 1/8-inch thickness on a lightly floured surface; cut out stars and stripes using cookie cutters , a knife, or a pastry wheel. Decorate tops of pie with cutouts, brushing bottoms with egg wash to help them adhere.

4. Preheat oven to 375 degrees. Brush tops of pie with egg wash, and sprinkle with sanding sugar. Transfer to a parchment-lined rimmed baking sheet.

5. Bake until juices are bubbling and tops are golden brown, 45 to 50 minutes. (Tent with foil if crusts are getting too dark.) Let cool.

Recipe adapted by Martha Stewart, Pies and Tarts

Vanilla Ice Cream

About 1 quart (1l)

For a richer custard, you can add up to 3 more egg yolks. For a less-rich custard, substitute half-and-half for the heavy cream, realizing that the final texture won’t be as rich or as smooth as if using cream.

Ingredients:

  • 1 cup (250ml) whole milk
  • A pinch of salt
  • 3/4 cup (150g) sugar
  • 1 vanilla bean, split lengthwise
  • 2 cups (500ml) heavy cream
  • 5 large egg yolks
  • 1 teaspoon pure vanilla extract

Directions:

1. Heat the milk, salt, and sugar in a saucepan. Scrape the seeds from the vanilla bean into the milk with a paring knife, then add the bean pod to the milk. Cover, remove from heat, and infuse for one hour.

2. To make the ice cream, set up an ice bath by placing a 2-quart (2l) bowl in a larger bowl partially filled with ice and water. Set a strainer over the top of the smaller bowl and pour the cream into the bowl.

3. In a separate bowl, stir together the egg yolks. Rewarm the milk then gradually pour some of the milk into the yolks, whisking constantly as you pour. Scrape the warmed yolks and milk back into the saucepan.

4. Cook over low heat, stirring constantly and scraping the bottom with a heat-resistant spatula, until the custard thickens enough to coat the spatula.

5. Strain the custard into the heavy cream. Stir over the ice until cool, add the vanilla extract, then refrigerate to chill thoroughly. Preferably overnight.

6. Remove the vanilla bean and freeze the custard in your ice cream maker according to the manufacturer’s instructions.

Note: Used vanilla beans can be rinsed and dried, then stored in a bin of sugar. That sugar can be used for baking and, of course, for future ice cream making.

Adapted from The Perfect Scoop (Ten Speed Press)


The Daring Baker’s Challenge: Battenberg Cake

So last month, while I was perusing the internet for other foodie blog inspiration, I discovered The Daring Kitchen. To quote the website, “The Daring Kitchen is the home of The Daring Bakers and The Daring Cooks. The premise of both groups is to create one recipe each month, given to us by a monthly host. We all create the same exact recipe and then post about it on our personal blogs on a designated date.” How awesome is that?!? So I decided to join The Daring Bakers.  Each month I will be challenged with a new recipe that will most likely be outside my comfort zone. When I got my first challenge a few weeks ago, I felt like a baking superhero, which is kind of their theme. In addition to my superhero status, my first challenge was to create a Battenburg Cake  to coincide with The Queen’s 60th Jubilee. For those of you who don’t already know, I am obsessed with the British Royal Family, especially Catherine, the Duchess of Cambridge. I even took the day off from work to watch the entire Royal Wedding of Catherine, Duchess of Cambridge to Prince William, Duke of Cambridge, so this Battenburg Cake challenge was right up my alley.

The first Battenberg cake was made to celebrate the marriage of Queen Victoria’s granddaughter, Princess Victoria, to husband Prince Louis of Battenberg.It’s traditionally flavoured with almond and has the signature Battenberg markings, that is, the yellow and pink squares (said to represent the four princes of Battenberg). The strips of sponge are glued together using jam (normally apricot) and the whole cake is covered in marzipan. Sometimes the edges are crimped and the top is patterned with a knife.

My Battenburg Cake below was actually my second attempt. My first attempt turned out perfectly fine until I started working with the marzipan. I had ordered it online since it is quite difficult to buy it in large amounts where I am located. Unfortunately, it started to crumble and tear as I tried to roll it out. It was also almost yellow in color and did not pop as well as the white fondant used in my second attempt. I did go with the traditional Battenburg recipe of the yellow and pink squares, but there were other options on the The Daring Kitchen website that included coffee and walnut and even a Rubix’s Cube recipe. All the recipes given had explicit step-by-step instructions and pictures to allow for baking success. All in all, I had a wonderful time with my first challenge and recommend The Daring Kitchen to anyone who loves being in the kitchen as much as I do!

Mandy of What The Fruitcake?! came to our rescue last minute to present us with the Battenberg Cake challenge! She highlighted Mary Berry’s techniques and recipes to allow us to create this unique little cake with ease.

Mojito Cupcakes

There is nothing better during the hot, summer months than a fruity, frothy alcoholic beverage.You know the ones I am talking about…they come with a wedge of orange or a happy little tropical umbrella! You picture yourself in your bikini on a sandy beach, reading a juicy novel when you think of them. Well, at least I do…minus the bikini part. Now don’t get me wrong, I am not a big drinker. In fact, that is why I love this post! I can enjoy the taste of all my favorite summer drinks sans the alcohol by making them into my favorite food group…cupcakes.

Now I have asked all my friends and family to name their favorite summer drinks. My goal is to make at least 6 of them into a cupcake. Here is the first one…my favorite…the Mojito. I am a big fan of mint and everything that contains mint. I even have my own mint growing in my herb garden. Although, it is separated from the rest of the herbs because if its not, it will take over your entire garden. Trust me! The Mojito typically has mint muddled at the bottom of the glass and as the other components are added, lime, rum, sugar, the mint compliments each one beautifully. My Mojito cupcake contains all of the components that the drink itself has, but I do simmer down the alcohol to remove the alcoholic content and  just allow for the taste of the rum flavoring. They are very tasty and unlike the drink, I can have more than one!

Favorite summer drink cupcake #2 – Pina Coladas

Recipe adapted from Brown Eyed Baker

Our Thankgiving Feast

I know it has been quite a long time since I have blogged and for that I am sorry. My goal was to post once a week, but ever since school has started back up, blogging has taken a back seat. I would like to update you on all the wonderful happenings in my life before I get down to the nitty gritty of my family’s traditional Thanksgiving feast.

First and foremost, I have not stopped cooking or baking! I have tried several new recipes over the last few months, but have neglected to either write them down or take pictures. I know! I know! But I do have several new apple pies in the freezer I will share with you, thanks to Sky Top Orchards in NC from which I picked several bushels of apples this fall. I have also been trying to cook a little lighter lately in hopes of myself being a little lighter before the holidays crept in and all the decadent and succulent food was placed in front of me. Second, I am absolutely loving my new position at my new school! Not only did I go from a 45 minute drive down to a 7 minute drive, but my class in itself is amazing! We have already covered mountains, rocks and minerals, the American Revolution, and much much more. Every Friday we have a science lab in class and it is so awesome to see the love for learning happening each and every day. I couldn’t be more blessed in my career. I also decided to be an assistant coach this year for Girls on the Run for grades 3-5. We are in training for our upcoming 5K in December and we were just in our small town Thanksgiving Parade. We had such a good time and after the 2 mile walk through main street, the day was so pretty, I decided to run all the way back.

So let’s talk turkey! My mom makes the very best Thanksgiving feast I have ever had and has been doing it for years. Well, this year we decided to document the event with pictures and write everything down. Now, she is not one for using precise measurement, so you are going to see a lot of  “a dash of this” or a “sprinkle of that.” Just use your best judgement if you are trying to recreate these amazing dishes. Above all, try to enjoy the process as much as my mother and I do each and every Thanksgiving.

One more thing….Happy Birthday Mom! I love you so much! **Cupcake courtesy of Sweet Cakes in Cornelius, NC. They have the best cupcakes in the South!

Sweet Potato Casserole has been in my family’s Thanksgiving feast ever since I can remember… Ingredients:

1 large can Yams (drained)

1 C sugar

2 eggs

2 t vanilla

2 sticks of melted butter

Beat yams until smooth and add rest of ingredients. Pour into a 9×13 pan.

Topping:

1 box or 16 oz. of light brown sugar

2/3 C flour

2 sticks of melted butter

1 C chopped pecans

Mix brown sugar and flour in a small bowl. Add rest of ingredients and crumble with your hands onto the top of the casserole. Bake at 350 degrees for 30-45 minutes. Enjoy!

Next up is one of my favorites!

Mandarin Orange Salad Ingredients:

2 small boxes of  each orange/pineapple jello

2 C mandarin oranges – drained

1 can crushed pineapple (Drain pineapple and reserve 1 C for topping or add orange juice)

Mix together jello per package directions and add oranges and pineapple. Put in 9×13 pan and chill until firm.

Topping:

1 egg

1/2 C sugar

2 T flour

2 T butter

1 C pineapple juice

1 package Dream Whip

On top of double boiler, beat egg, sugar, and flour. Slowly pour in juice. With an electric mixer, beat until thick and smooth. Remove and add 2 T butter. Chill 1 1/2 hours. When cold, beat 1 package of Dream Whip per package directions and fold into chilled topping. Spread onto jello.

With a post this big I plan to spread it out over the next few days, so tomorrow….turkey, stuffing, and mashed potatoes! I hope everyone had a wonderful and Happy Thanksgiving.

32-while-32 One Month Update

I have to say that I am pretty proud of all that I have accomplished in one month since I posted my 32-while-32 list! I am still looking for that finally goal to complete, so send in your suggestions! I am up for baking or cooking anything new and interesting…maybe sushi?!

32 while 32

Food/Blogging:

1. Make 3 types of bread (Sarabeth’s Bakery has a ton of various bread recipes and ideas). Whole wheat pretzel buns

2. Develop a tart crust as good as Paulette’s (The Whirling Whisk…great stuff!).

3. Use 5 ingredients that I have never worked with before—suggestions welcomed. Imitation butter flavoring, fondant…3 more to go!

4. Post a new cooking/baking adventure once a week. I have been pretty consistent with keeping up with this goal!

5. Take one recipe from every cookbook I have bought in the last year and recreate it in my kitchen to post on my blog.

6. Become more decorator savvy when it comes to desserts, cakes, and pies. Did you see my cheeseburger cake?

7. Create a homemade blackberry pie for my favorite FIL. I missed out on this one, but I did make a red velvet layer cake.

8. Make a birthday cake for my husband that looks like a cheeseburger. (That I will post on the 15th of July, so be on the lookout). DONE!

9. Hone in on my egg skills—make eggs Benedict, poached eggs, omelets, sunny side up, etc… Skillet Eggs with Squash helped me on this goal! Still needs work though!

10. Hold Thanksgiving or Christmas dinner (your choice Mom) and finally learn how to make good gravy.

11. Try out 1 new restaurant a month and if it is good and write a review on it and post it on the blog.

12. Soups –not a big soup person, so I would like to make my Mom’s chicken soup, clam chowder, corn chowder, and lobster bisque.

13. Develop 5 new cupcake flavors. I tried S’mores and Margarita cupcakes so far!


Relationships:

14. Start my own Women’s Life Group at church. Beginning in September!

15. Develop new friendships at my new school and with my 4th grade team. Love my new team! School starts in a week!

16. Remember to send birthday cards to all my friends and family on time. Been on time so far!

17. Monthly Girls Bunco/Poker night anyone?

18. Volunteer on a weekly, if not, bi-weekly basis – Sunday school, soup kitchens, etc. I am the service coordinator at church for the CKC preschoolers! They are so cute!

19. Visit my FL home more often. I am going home in October to visit (and to see the Wizarding World of Harry Potter), as well as Christmas!

Educational/Random:

20. Reread all Harry Potter books just for fun.

21. Research 4th grade at PLP and work closely with my teaching mentor.

22. Really think about getting my Masters and put things in place for the following year.

23. Become more open minded to the movies/activities that my hubby is interested in.

24. Pay off my car.

Healthy Living:

25. Lose 20 more lbs.

26. Run a 5K and a 10K.

27. Go to the spa for a facial and a massage. DONE!

Travel and Entertainment:

28. See the Blue Man Group. DONE!

29. Go to another musical – Cats, Wicked, Rent… whatever!

30. Spend a few days at Ocracoke Island.

31. Go white water rafting and zip lining at the U.S. National White Water Center.

Reader’s Choice

32. I’m one goal short of 32, so I thought I’d add a reader’s choice item. Leave a comment here with something you’d like to see me do. Whether it’s a recipe to try or an activity or festival to go to, just let me know in the comments below. I will sit down and choose one from the comments within the next few weeks and I’ll include it in my one month update in August. What would you like to see me do, cook, or bake!! I love, love, love your comments!!:)