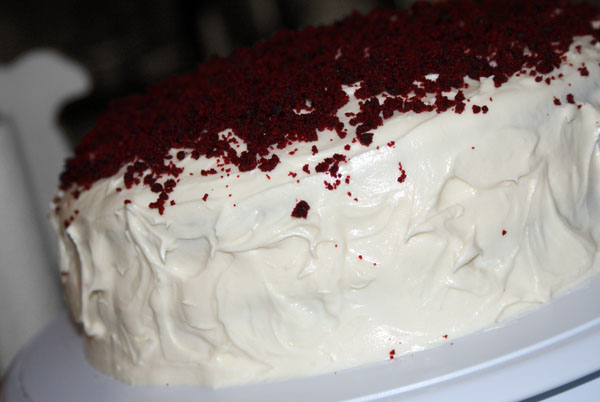
When you think of father-in-laws you typically think of old, grouchy men who like to smoke cigars and tell stories of their youth and how much better the world was back then. Now true, the world was a much safer place “back then” and there is nothing wrong with cigars, but that is just not my father-in-law. I happen to have the best father-in-law a girl could ask for! He is funny, quick witted, and frankly, hard to keep up with…oh, and very well dressed! And today is his 40th (ahem…) birthday!! So about a week ago, I called my most prized bakery to order his favorite red velvet cake only to find out that they don’t do red velvet cake anymore! WHAT?! I was shocked! Not make red velvet cake?! What was I going to do?! I couldn’t trust just anyone to make a good red velvet cake for the best FIL in the world! So I decided to make my own red velvet layer cake. It came out perfect! The cake was moist, the frosting was decadent, and everyone loved it! Happy 40th Birthday Terry! May you have many more 40th birthdays in the years to come! I love you!
Terry’s Red Velvet Layer Cake with Cream Cheese Frosting
Ingredients:
For the Cakes:
8 tablespoons unsalted butter, at room temperature
1 1/2 cup granulated sugar
2 eggs
5 tablespoons unsweetened cocoa powder
6 tablespoons red food coloring
1 teaspoon vanilla extract
1 cup buttermilk
2 cup + 4 tablespoons all-purpose flour
1 teaspoon salt
1 teaspoon baking soda
3 teaspoons distilled white vinegar
For the Cream Cheese Frosting:
8 ounces butter, at room temperature
8 ounces cream cheese, at room temperature
4 1/2-5 cups powdered sugar
2 tablespoon vanilla extract
Country Ganache – 1 cup white chocolate chips, 2-3 tablespoons buttermilk, microwaved for 1 minute on half power, stir, and then microwave in 30 seconds increments until melted.
Directions:
1. Preheat oven to 350 degrees F. Grease two 9 inch pans.
2. On medium-high speed, cream the butter and sugar until light and fluffy, about 3 minutes. Turn the mixer to high and add the eggs. Scrape down the bowl and beat until well incorporated.
3. In a separate small bowl, mix together the cocoa powder, vanilla extract and red food coloring to make a thick paste. Add to the batter and mix on medium speed until completely combined. You may need to stop the mixer to scrape the bottom of the bowl, making sure that all the batter gets color.
4. Reduce the mixer speed to low and slowly add half of the buttermilk. Add half of the flour and mix until combined. Scrape the bowl and repeat the process with the remaining milk and flour. Beat on high until smooth.
5. Again, reduce the mixer speed to low and add the salt, baking soda and vinegar. Turn to high and beat for another couple of minutes until completely combined and smooth.
6. Divide the batter evenly between the cake pans and bake for about 20-25 minutes, or until a thin knife or skewer inserted into the center of the cakes comes out clean.
7. Cool for 10 minutes and then remove cakes from the pan and place them on a cooling rack to cool completely before frosting. I would even make the cakes a day ahead and place them in the fridge so that it is easier to level them.
8. To make the frosting: Using the whisk attachment, whip the butter and cream cheese on high speed for about 5 minutes, scraping the bowl down as necessary. Reduce the speed to low and slowly alternate the powdered sugar and country ganache until all is incorporated. You do not have to use all of the ganache in your frosting. Use only as needed making sure your frosting does not get too heavy. Add the vanilla and mix to combine. Increase the speed to medium high and whip for a few minutes until the frosting is light and fluffy, scraping the bowl as necessary.
Level off your cakes and save the crumbles. I actually placed my cake crumbles in the food processor to make them finer and a bit prettier. Frost a small layer of icing on top of the bottom cake before placing your second layer cake on top. Frost the top and sides of the cake and use the crumbles to decorate the top of your cake.
(Recipe adapted from Joy the Baker, originally from The Hummingbird Bakery Cookbook)
